
The Importance Of A Properly Aligned Finder Device
One of the most important and overlooked matters to consider to prevent untold frustration in observational and imaging astronomy is being able to easily, quickly and reliably find the object you want to observe or image. The smaller the field of view of the telescope/camera/eyepiece combination, the more difficult and important this becomes. When you factor in the fact that the subject may not yet be in proper focus it is clear that just pointing the telescope in the direction of the moon, planet or object and hoping that it will be in the field of view (FoV) is a forlorn hope and leads to great frustration whilst you are hunting around trying to get the object both in focus and in the FoV. I’m a mild natured person and even I have been found cursing at the EP on many occasion trying to do this!

With the advent of relatively affordable and excellent telescopes of the Schmidt-Cassegrain (SCT) design from Celestron, Skywatcher and Meade, their long focal length presents challenges in getting the object in the FoV. You can be moving the telescope, either manually or via the handset/computer, seemingly for an age, trying to get the blasted object in the centre of the EP or camera! The more powerful the eyepiece, or smaller the chip of the camera, the more difficult this becomes. It doesn't take long, especially when cold, to become utterly exasperated by this process and I have been known to give up and storm off back inside the house in frustration!
A great example is in the case of planetary work. The planets are a great distance from us and as such present a tiny angular diameter on the sky. Rarely can any planet be more than 45 arc seconds in angular diameter and they are usually much smaller than this. For example, a popular target such as Mars is often as little as 10 arc seconds across, the equivalent of observing a US nickel or a UK five penny piece 300 metres away. By way of comparison, The Moon is 1800 arc secs across. Consequently, to get an image on the camera or be able to get the planet into a position to be able to see details on its surface requires a great deal of magnification along with good seeing with a long focal length telescope. Even then, it is not uncommon to combine this with a Barlow lens of power x2 or x3 (or more) to create a F20 or F30 optical system in order to see more detail. So it is no wonder that when imaging/observing with such a long focal length and at such high power, getting the image onto the chip or into a high-power eyepiece is a challenge and can be an exercise in frustration. The answer to this is an accurately aligned finder device so that you can get the object into the FoV of the low powered finder with an assurance that it will then be visible in the main telescope.
Even though you may be impatient to get observing as soon as possible, getting the finder properly set up and aligned is well worth your time.
People use and prefer different types of finder scopes. Whatever type you use - I prefer Telrad's and red dot finders - getting them aligned with the optical axis of the telescope is the important factor, as discussed.
How accurately do you need to align it? That depends on what you want to generally observe. If you are using plate-solving for deep sky astro imaging and never use the scope visually then you may need no finder at all and you can leave the iterative plate solving process to automatically align the scope. However, for planetary observing and imaging you need to get the finder as accurately aligned as possible.
Here is my procedure and it is the same whatever the type of finder device you use; Telrad, finder scope or red dot finder. And before you start make sure the finder scope is VERY sturdily mounted to the main scope. Any bump or movement of the finder with respect to the main scope will ruin the alignment of the finder with the optical axis. It is very frustrating to complete the procedure, congratulate yourself for a job well done, get ready to observe only then to inadvertently bang the finder out of alignment!! Doh...!
- Use a wide field EP and select a bright star and then get this star into the centre of the FoV of the telescope. It often helps to de-focus the star so you can see the concentric rings so as to judge the centre of the FoV. This is the most frustrating step of the whole procedure so take your time and remain calm! :)
- Now align the finder device - whatever type it happens to be (i.e. Telrad/Red-Dot/Finderscope) with its adjustment screws to get the same star centred into the FoV of the finder device. TIP. Do yourself a favour and be sure you are aligning on the same star that is in your main scope! Without kidding you, I have aligned the finder on a different star before and then wondered why I couldn't find anything!
- Put a mid powered EP into the main scope. You will often note that the star that you centred in step one is no longer centred or, in some occasions, has moved out of the FOV. this is because the higher power of this second EP amplifies any error of what you thought was an accurate centering in step one. The defocus of the star in step 1 will make it easier to see whether the star is outside the FoV so you can bring it back into the centre more easily.
- Now that you have the star in the FoV of the main scope readjust the finder a second time to get the star into the crosshairs or in the middle of the red rings or dot.
- Optionally repeat this procedure with a still higher power EP to further refine the finder's accuracy in alignment with the main scope. The more accurately you can get the finder aligned with the main telescope the more enjoyable and easy it will be to use your telescope. Trust me, it is worth this time you are spending here.
To give you an example. When I do this procedure with my Celestron C925 SCT scope, I will first use my Televue Panoptic 35mm EP in the telescope. Now, consider that with a Celestron C925 even this EP is quite a reasonable magnification of 67. Hence without the finder this can take some fiddling (and cursing) to get a star into the C925's FoV because the FoV of the EP - even though it is a wide-angle EP - is quite small with the C925's 2350mm focal length. I then get my Telrad finder aligned with this same star. I then move to my Radian 17mm EP (138 magnification) to further refine the guider then followed by the 17mm with a X2 Powermate (276 magnification) to finally refine it. I will do this procedure on my permanently mounted scope every six months or so. Clearly, any knock, bang or movement of the finder will ruin its alignment and the procedure will have to be repeated.
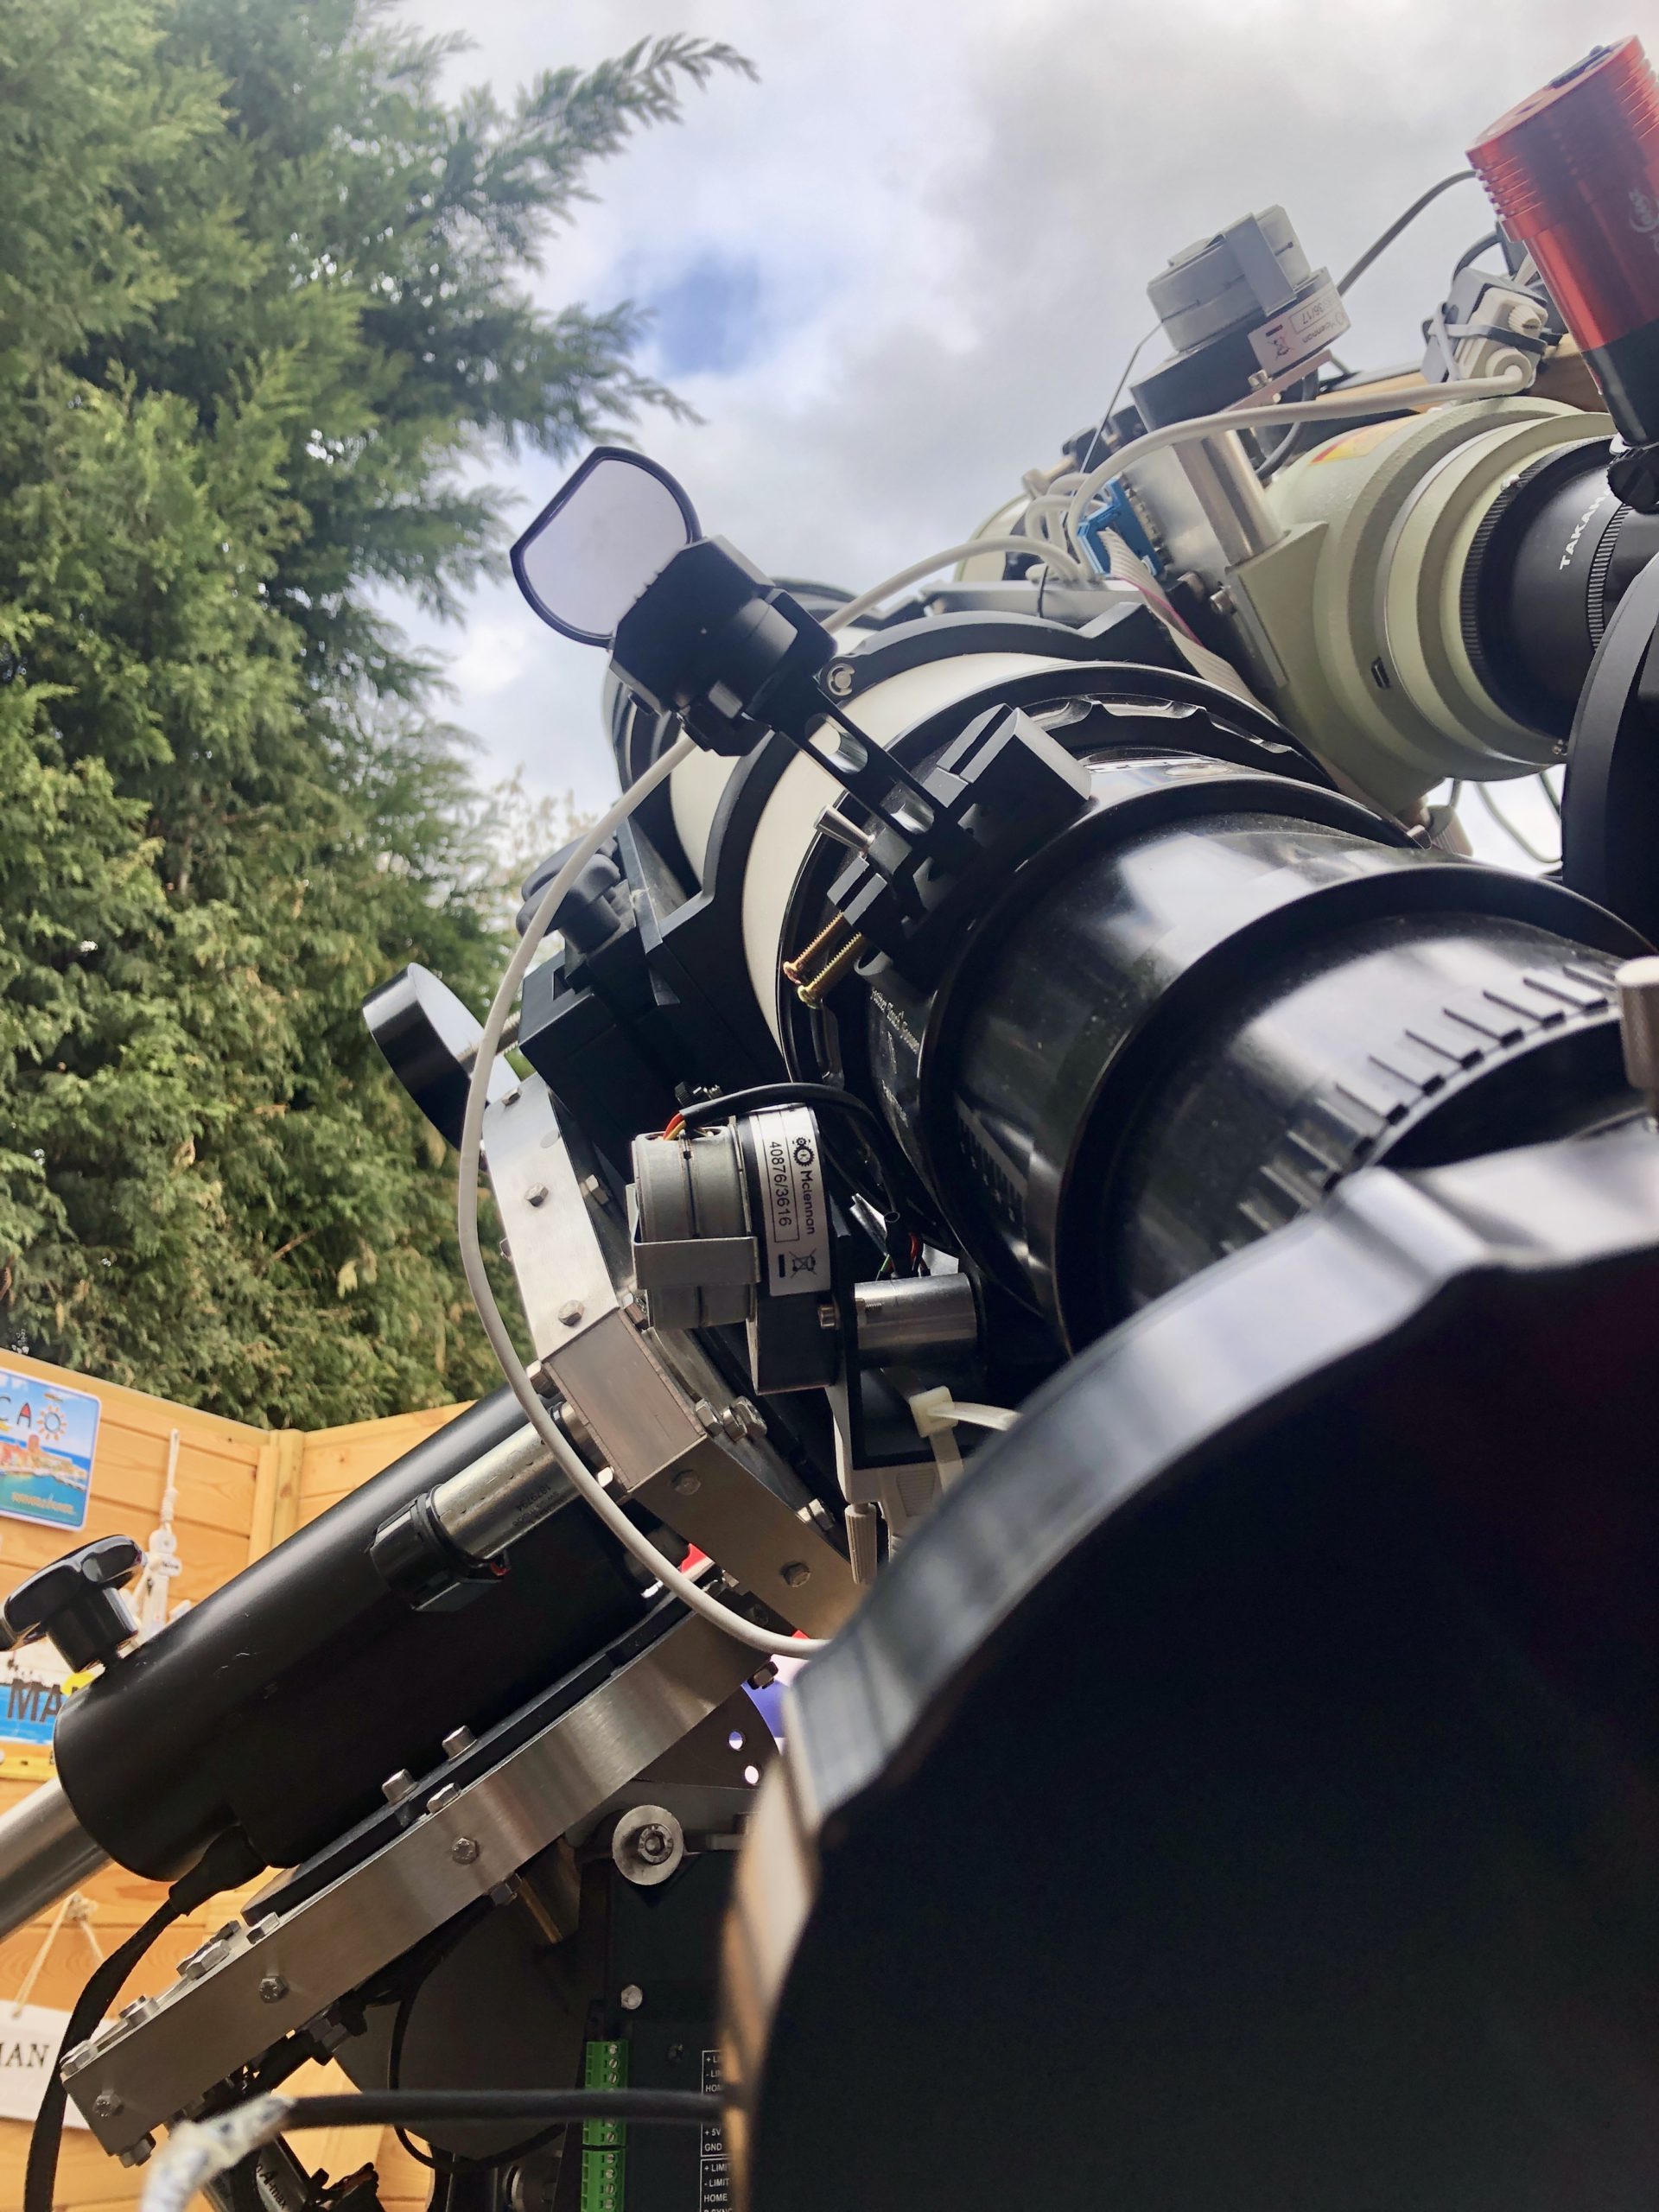
I have finders on all of my telescopes that I use. I use a Telrad on my C925 SCT and a Red-Dot Finder on my TEC140 and on my FSQ85. I also have another Telrad on my 12" Dob reflector scope. These devices are not expensive and are crucial to the enjoyment of your telescope.
I hope you found this article useful and that I have convinced you to invest the time in a properly aligned finder device!
Clear skies!
First Light Image From QHY268C and FSQ85

Full Size Image here (opens in a new tab).
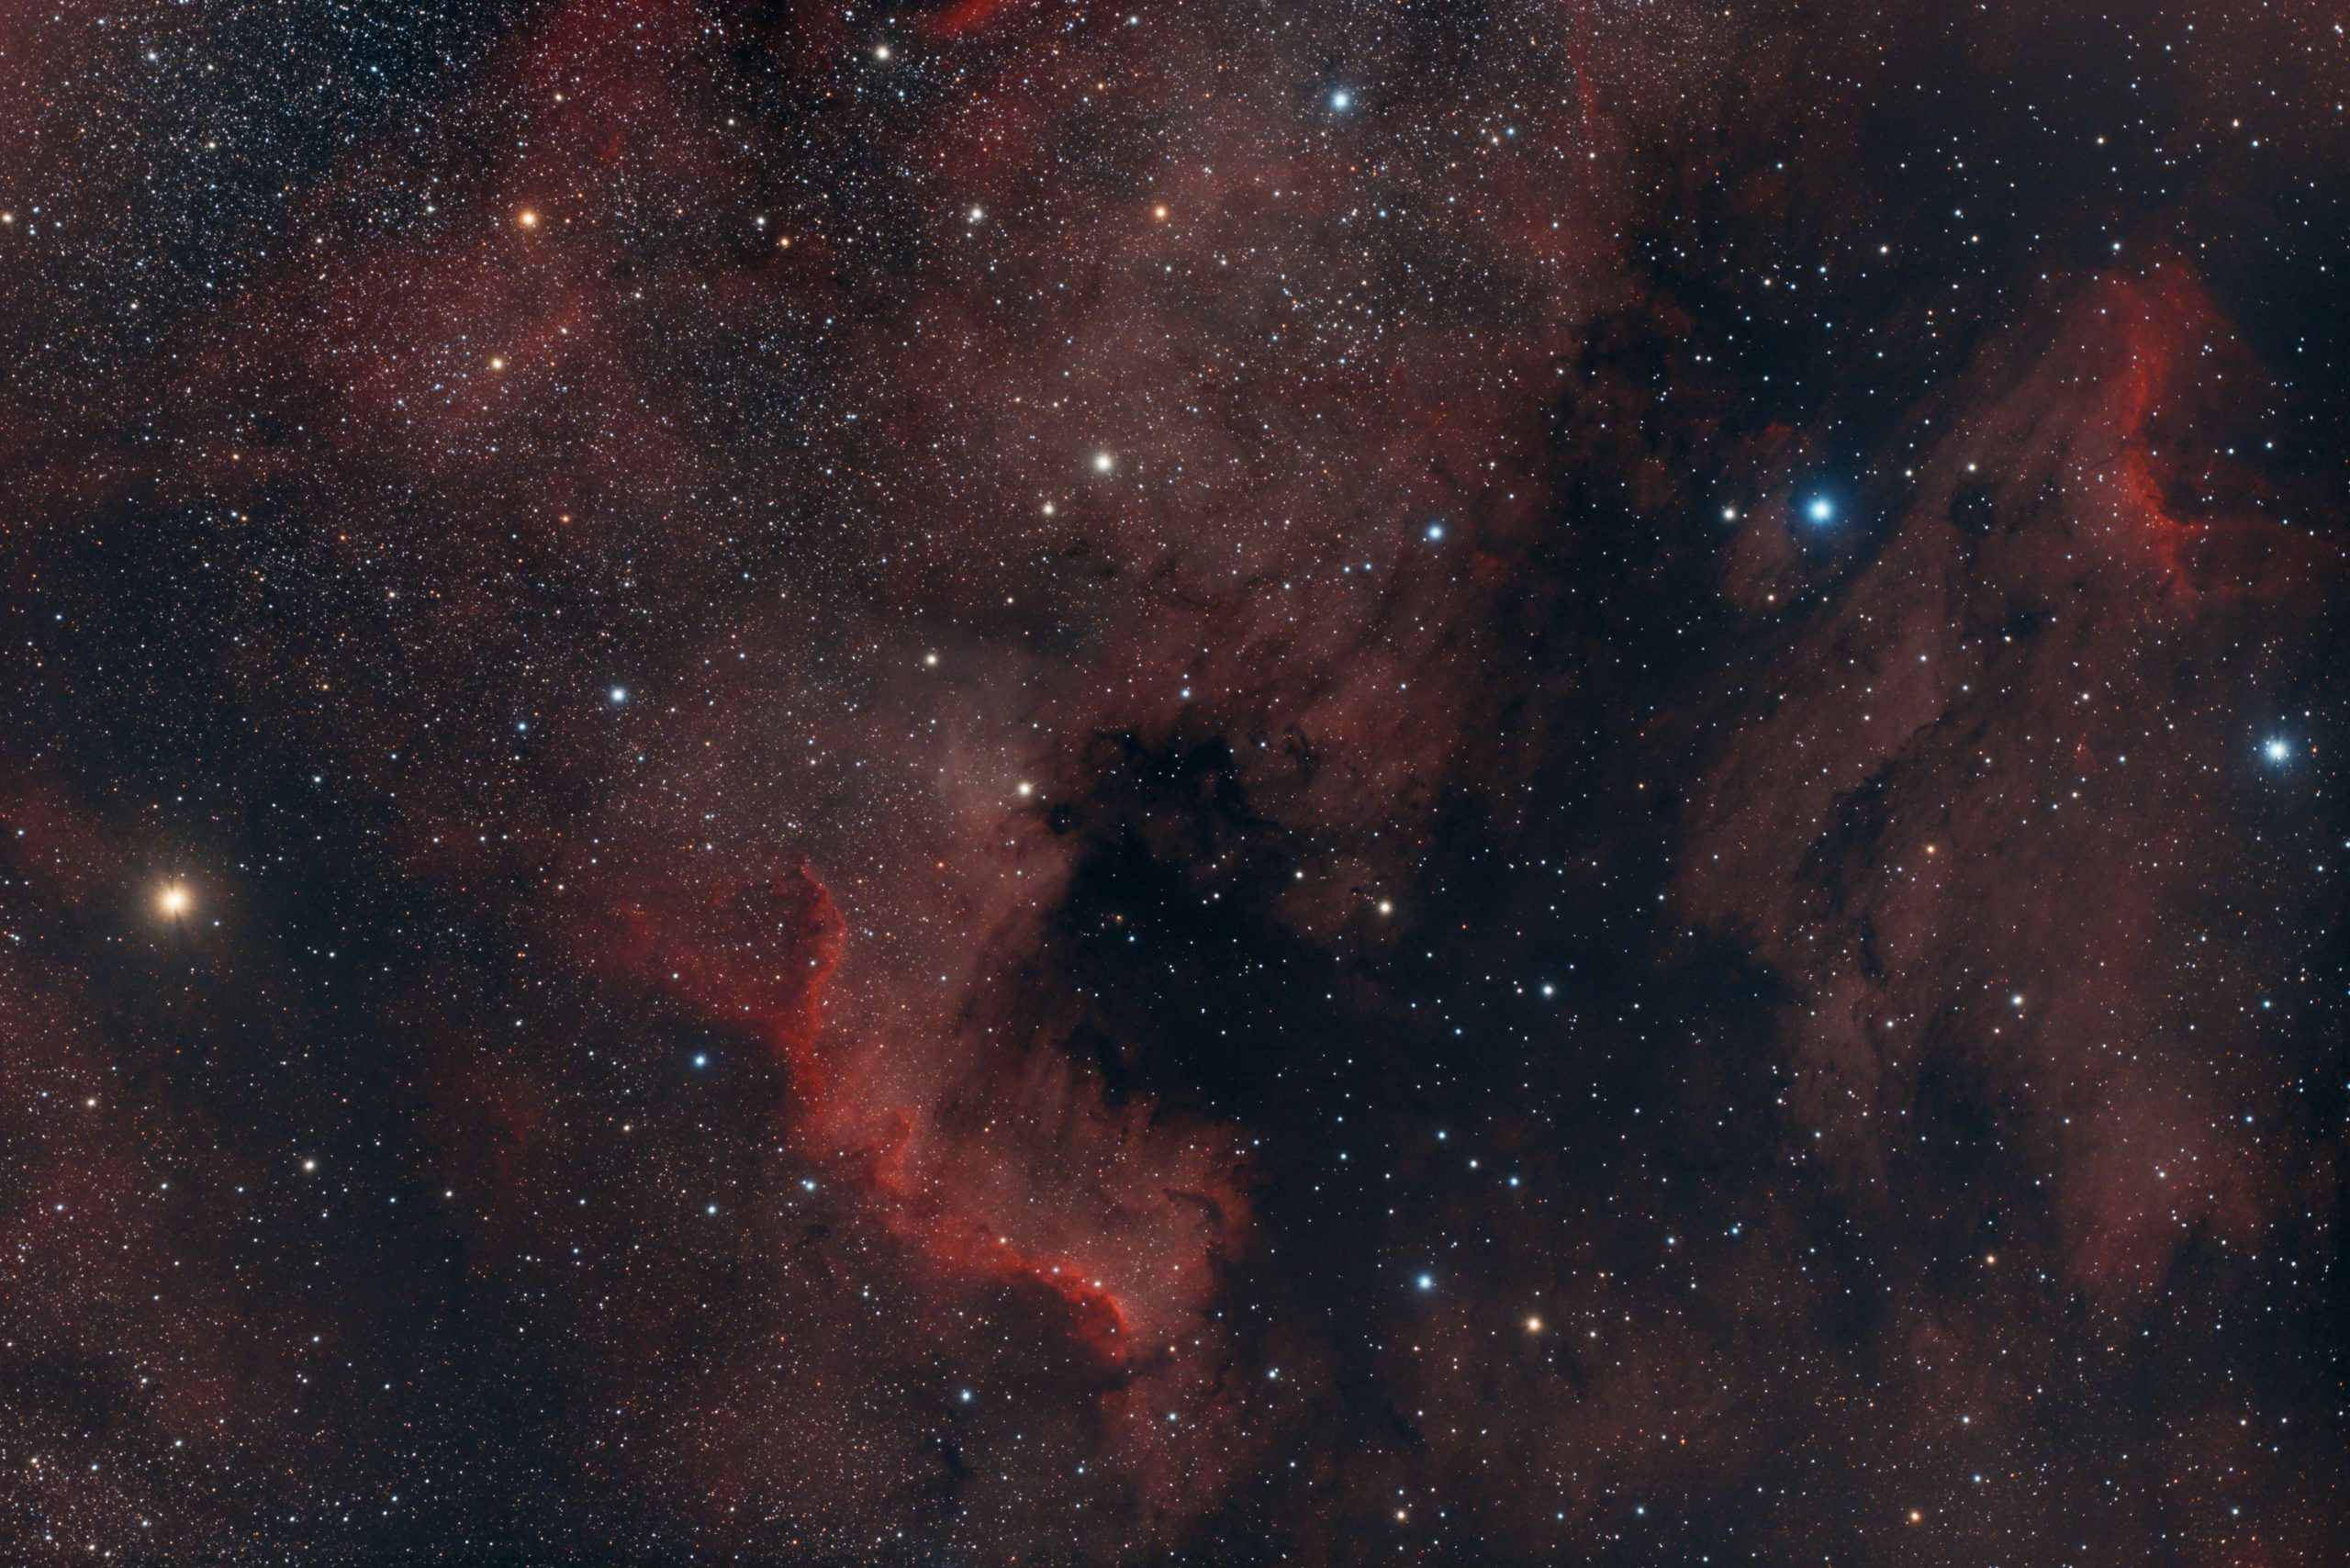
This my first semi-completed image from the QHY268C and so far I am impressed with its performance. I discuss unboxing the camera and also how I connect it to the FSQ85 in other posts on my site.
This image - above - of The North American and Pelican Nebulae is a stack of 47 x 180s exposures at Gain 0 and Offset 30 at -15C on my Takahashi FSQ85. This is my first deep-sky CMOS camera and I had to research how to preprocess the data from the camera and I will discuss this in another post.
Since I acquired the camera and in keeping with the "new gear curse", I have been constantly frustrated by wet weather and cloudy skies for almost a month. The 47 exposures for this image were spread out over about seven imaging sessions, sometimes with as few as four exposures per session, such as been cloudy nature of the skies of late where I live - Nottingham, UK. I'd set up, get everything running and then it would cloud over.

I'm really happy how clean the images look as you can see from the single 180 exposure above. Very little processing work is needed to bring out the detail in good data. I was a bit concerned initially about the visual appearance of the master dark but it did the job of removing the artefacts in the lights.
Below is an annotated version of the main picture at top.

The relatively large APS-C sensor, 16-bit resolution and high pixel count, allied to very low noise and zero amp glow make this camera an incredibly powerful proposition. I understandf QHY and ZWO are about to release a mono version of this camera shortly.
I think it is not unreasonable to say the era of CCD in amateur photography is pretty much over with these incredibly powerful and cost effective CMOS cameras being released nowadays (Oct 2020).
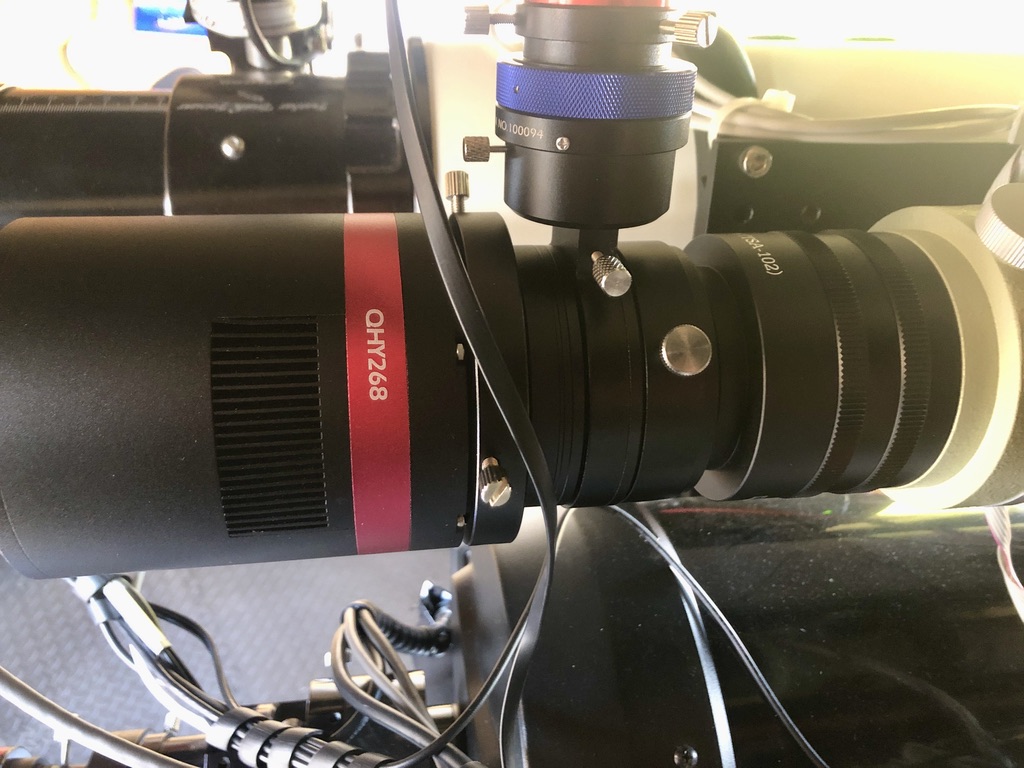
Connecting QHY268C/OAG To FSQ85 (none reduced) With An All-Threaded Connection
Introduction
I've bought a QHY268C colour CMOS camera and a QHYOAG-M as discussed in my post here. As I explain in that post, my intention is to connect this up to my Takahashi FSQ85 "BabyQ" and make it an extensible system so that with easy and minor changes I can also connect the camera/OAG assembly to my Williams Optics Redcat 51, Samyang 135mm lens and maybe other optical systems (although its primary use will be on the FSQ85). I also explain in that post how to configure the QHY268C and the OAG assembly such that both camera and guide camera can both reach focus simultaneously by "padding" out the camera side of the OAG with about 13mm of spacers between the OAG and the camera in order to get both cameras to simultaneously focus.
I now needed to determine a way to mount the OAG-QHY268C assembly via a threaded method to the FSQ (and Redcat). I do not like the 2" barrel compression method of attaching expensive camera assemblies to telescopes for imaging purposes (fine for visual). Your mileage may vary but in my opinion they are risky at best and can introduce tilt into the optical train. I have had them fall out before (fortunately caught by the USB and power cables). So in the context of this discussion it has to be a threaded method of attachment and furthermore this method must allow for the insertion of a 2" filter. I need to use a 2" IDAS light pollution filter in the imaging train because of my backyard Bortle 5 suburban skies so I needed to figure this out. Furthermore, this filter must be easily and readily changeable - possibly when set up at night - since I have plans to use this camera with a narrowband filter such as the Optolong L-Extreme.
Bear in mind when considering filters that even though the QHY268C is a OSC camera, there is nothing to prevent you from using a filter wheel between the camera and the OAG. This FW can be populated with an LDAS LP filter and an L-Extreme (and others). It would also serve to "pad" the camera back from the OAG to achieve the objectives I outlined in my previous post. However, for now I have exhausted the budget and do not wish to use a filter wheel. So I need to install a filter drawer into the imaging train, and I needed to figure out how.
NOTE: This mechanism I describe applies to the Takahashi FSQ85. I can't comment if it works on other Takahashi telescopes. One tends not to have multiple Takahashi FSQ telescopes ($$$$$$$) ! 
SECOND NOTE: The method I describe is the telescope at native focal length without the FSQ 0.73 reducer. I no longer use the focal reducer with this telescope and sold it.

The Crazy And Expensive World Of Takahashi Adapters.
As owners of Takahashi refractors will be very aware, if you want an all-threaded method of connection then several costly adapters are needed to get the telescope to focus with a camera. The focal point of the telescope is a quite a distance from the rear of the focuser housing - about 200mm or so in my example. Therefore, to get the camera to focus this space must be made up by racking out the focuser and also with adapters. The stock focuser with the FSQ85 does indeed rack out a long way, but not enough to make up for the 200mm distance to the focus point. It is never a good idea to have the focuser racked out too far because doing so can introduce a slight flop and sag in the focuser, a bad thing when imaging since the imaging sensor in the camera will not then be orthogonal to the imaging circle. With that in mind, the adapters I choose are such that the focuser is 80% into the focuser housing to minimise any flop risk.
As an aside, my FSQ85 example is from 2012 and has a good focuser but I have heard reports that the focuser on more recent examples are not as good and cause issues in the corners of the image. Indeed, I have heard where people have upgraded to a Starlight Instruments focuser at a cost of £700, rather a lot to have to pay on top of the already eye-watering cost of Takahashi FSQ ownership! 😱

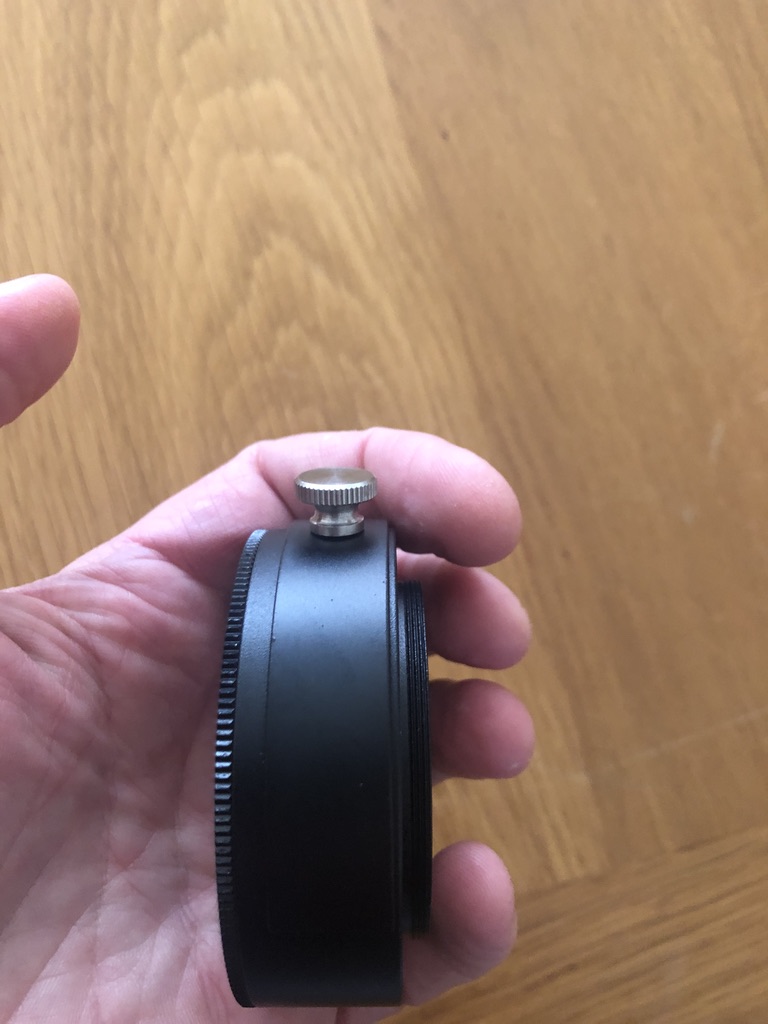
Please refer to the top picture. The first adapters I have used are two Takahashi TKA31581 Vari-Ring Spacers, each of which adds 17mm to the imaging train. This has a 72mm male telescope side thread and ends in a 72mm female camera side. These adapters are not too expensive, about £21 each in the UK. So with two of them in series I am adding 34mm to the imaging train. You can add as many of these as you wish to get the back focus for a particular situation, hence the term "vari" in the adapter name.
As an aside, Instead of using the two adapters I used, you could instead use the Takahashi Auxiliary Extender (TKA23250) which extends the M72 female threads at the end of the focuser tube and presents a female M72 thread. This adds 50mm to the imaging train.
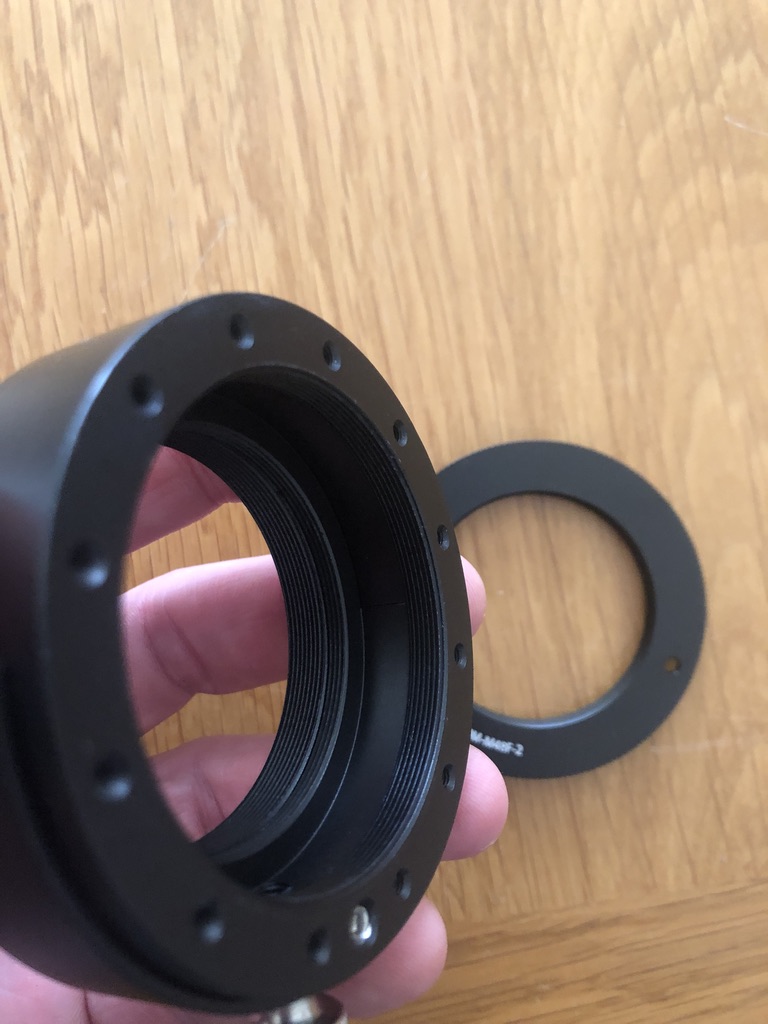
The next part in the imaging train is the CA35 TSA102 (TKA23201) adapter whose purpose is to drop the Takahashi 72mm thread from the auxiliary extender down to a more standardised 54mm thread. This adapter has a 72mm male thread on the telescope side and drops the aperture down to M54 female so that common accessories can be used. No other manufacturer that I know of uses M72 other than Takahashi so we need a way to convert from the Takahashi M72 to an "ordinary" system! The CA35 adapter is what does this and it also adds another 25mm to the imaging train. This adapter is more expensive at about £60. I told you these adapters were expensive !!!!!
NOTE: I already owned the above adapters a decade before I bought the QHY268C since most FSQ85 users will own them for other imaging requirements. However, they are additional to the purchase of the scope itself. Takahashi ownership is an expensive business!
Connecting To The Back Of The CA35 With The ZWO Filter Drawer (and rationale for going this route)
The adapters I explained in the paragraphs above are quite "standard" in the context of setting up a FSQ85 all-threaded imaging system. I now needed to work out how to connect the QHYOAG-M to the CA35 with a filter drawer. I also still needed to make up some distance in the imaging train to get to the 200mm or so needed to get the cameras to focus because even with the above adapters it is still short of the required distance to get the camera to focus.
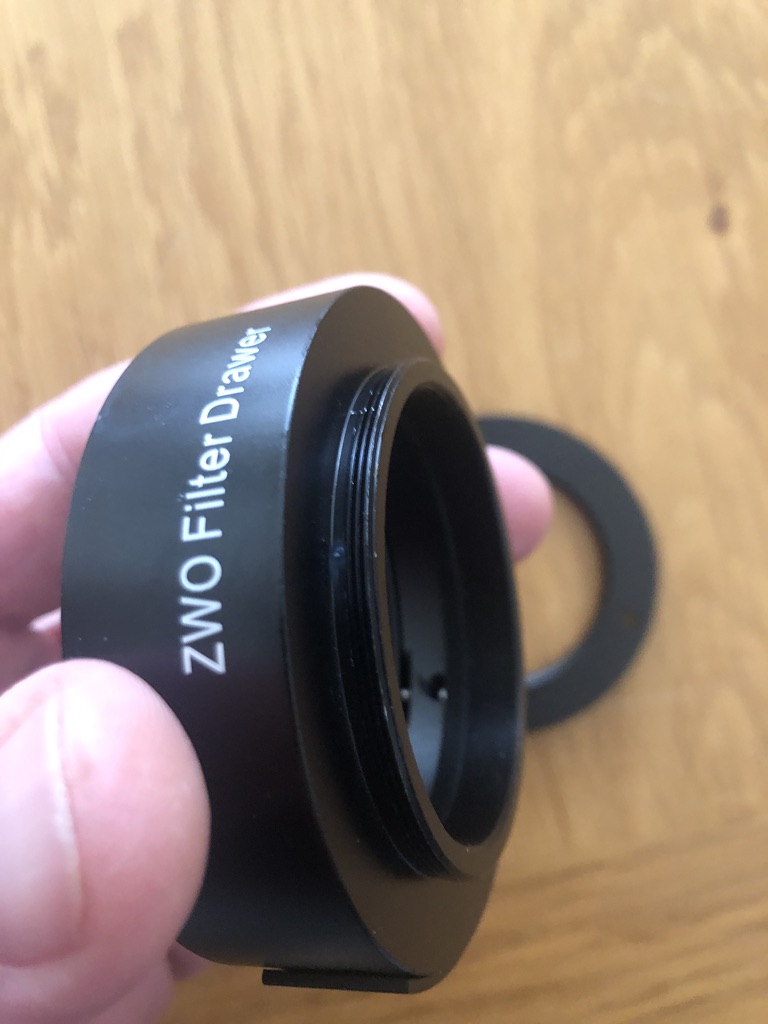
I need a way to be able to insert 2" filters into the imaging train, as discussed above. For sure, I'd always image in OSC with either a LDAS LP filter or a UV/IR cut filter in front of the camera. But I might want to image with a filter such as the Optolong L-Extreme filter too. This means whatever filter I use must be readily changeable when at the scope. QHY supply a spacer with the QHY268C that has a thread for a 2" filter and this can be used to space out the the OAG on the camera-side as discussed in my previous thread. The problem with that method is that it makes the filter difficult to get access to and change, not impossible but tricky and awkward, certainly so at night when, for whaever reason, you change your mind and need to image soemthing different! Another way is I could use a filter wheel between the OAG and the camera but I don't want to spend another £300 on this and have another device needing power/USB. So my thoughts were to use a filter drawer in front of the OAG.
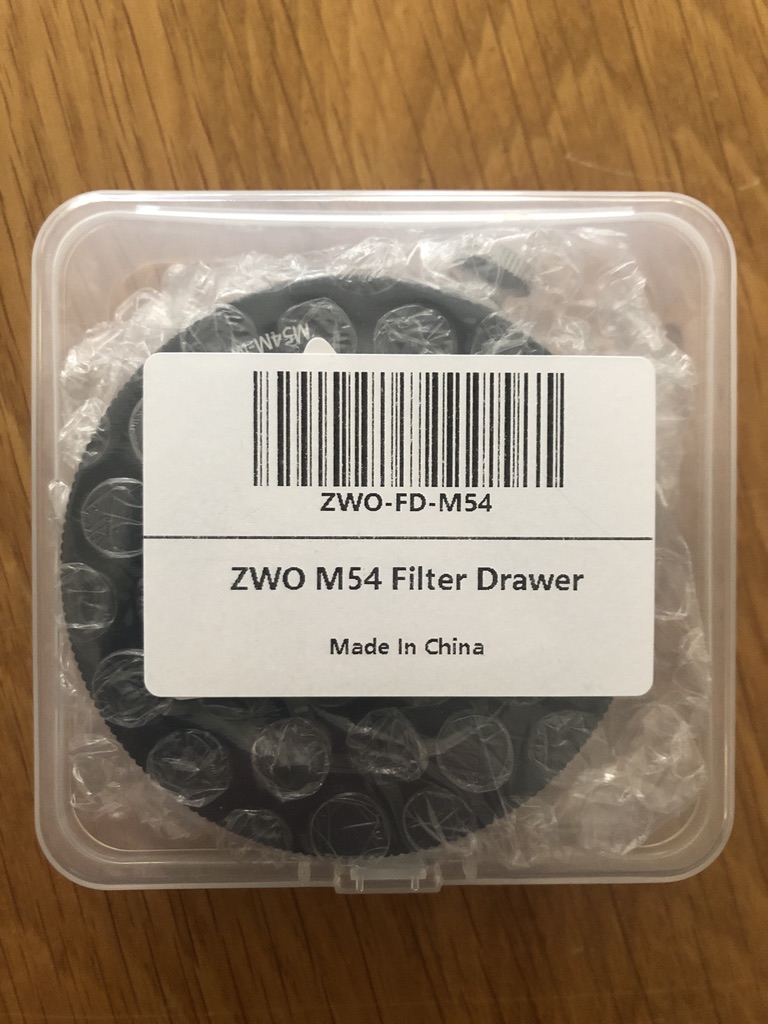
ZWO make a filter drawer (£75) with a 2" compartment for filters and with M54 fitting scope and camera side. I need the filter drawer to have two male M54 threads on either side ideally ideally so that it can mount with the QHY OAG mounting plate and also the CA35 - both of which expose a female M54 thread. However, the ZWO is made with male M54 on one side and female M54 on the other, so I need to change the gender of one side  . Using a filter drawer like this in front of the OAG was a gamble in case I could not pick up guide stars through the filter. More on that later.....
The filter drawer has a slide-in compartment with a strong magnetic catch to keep it secure. The drawer is also provided with a very useful accessory; a M54 male step-down adapter to M48 female. As it happens, the Williams Optics Redcat also has a male M48 on which to mount a camera. So this makes a perfect system and I can kill two birds with one stone.
1. If I mount the ZWO filter drawer with the M54 female side facing the telescope, then I can use an M54 male to M54 male gender change adapter (Takahashi OU031) to connect the female side of the filter drawer to the M54 female thread of the camera side of the CA35 Takahashi adapter. The male side of the filter drawer then screws directly into the OAG.
2. If I want to mount the camera to the Redcat I remove the camera after the M54-M54 male-male adapter, install the screw-in ZWO supplied M54>M48F adapter and I can then mount the whole OAG/Camera/Filter drawer assembly to the Redcat :) Additionally with this filter drawer it will connect onto my Samyang/Rokinon 135mm lens that I have modified slightly with this adapter.
The ZWO filter drawer also adds 24mm of back focus to get us to our goal of 200mm or so to get the cameras focused.
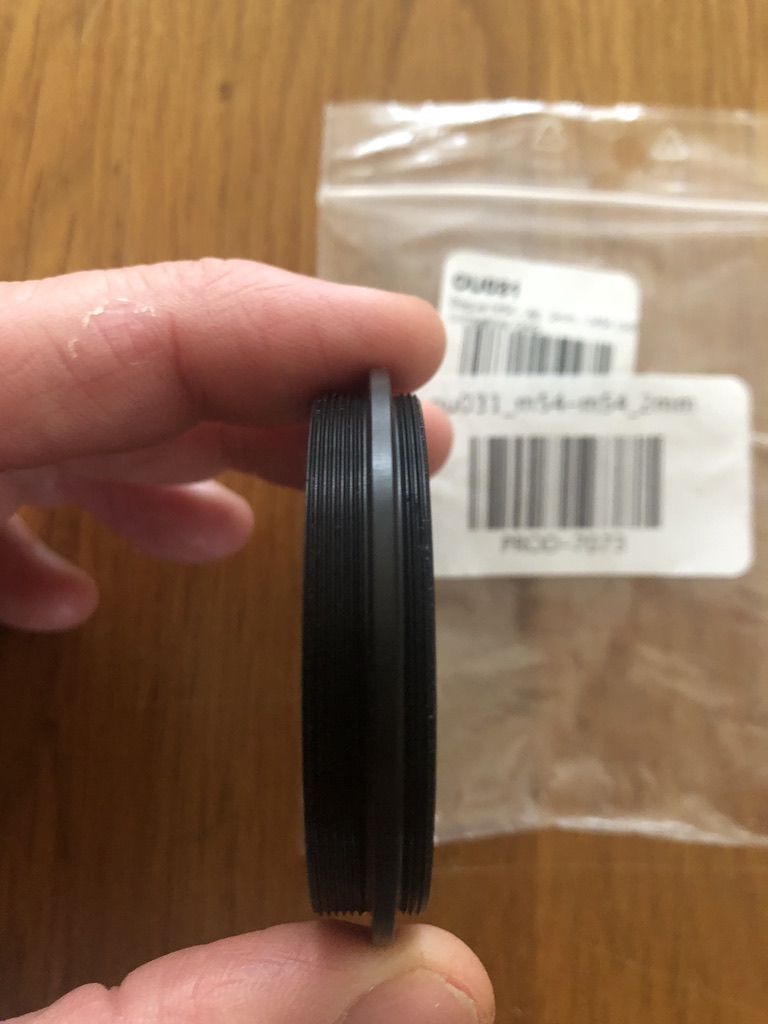
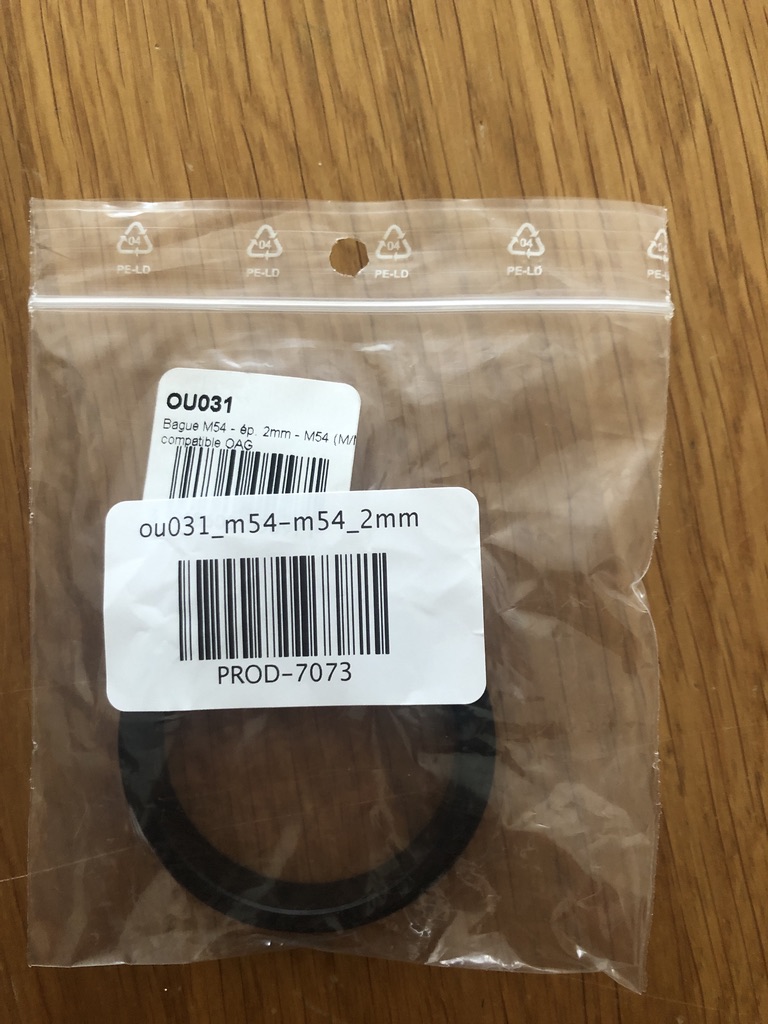
The Takahashi OU031 adapter above joins the female side of the ZWO filter drawer to the female side of the CA35. This simple adapter costs an astonishing £62 ! Other than make them myself I see little alternative other than to pay this exorbitant price.
The male (i.e. camera) side of the filter drawer screws into the M54 female telescope side of the OAG.
And there, we have a completely threaded mounting solution with QHY268C and the guidecam focused at the correct distance!
Will The Guidecam Focus ?
Clearly, the mechanism described has the filter drawer out in front of the OAG and the guidecam. In other words, the guidecam must look through the filter to find a guide star. This was a concern when I set up this arrangement, would guide stars show through? However, I can confirm that with a 2" LDAS LP filter installed the guidecam picked up stars without any problem at all. This will be by far my most predominant use-case for my QHY268C - 95% of the time I will be doing broadband.
Now, that said, I am interested in acquiring an Optolong L-extreme filter which only allows through some very specific narrowband emission lines. It will remain to be seen if a guidestar can work with this filter drawer arrangement and if a guidestar can be seen through the L-Extreme filter. If not, I will need to have a rethink and see if the L-extreme can be installed behind the OAG in some way on the occasions when I may want to capture narrowband through with this camera.
Update: 12 October 2020
The weather in the UK has been very cloudy and wet and since I authored this page and since then I have only had only snatched 15 minutes of clear sky time here and there; imaging in the UK is exceptionally challenging! However, on 11th October I managed to build a picture from 47 subs. Please see my first light post to read about this. A sneak peek on the image below :)
Update 2: 16 October 2020
I had an unexpected clear night, although the seeing was bad, and managed to get 55 x 4 minute subs of IC1396 - Elephant Trunk Nebula.
I think the camera is a good one and exciting times ahead with it hopefully :)

Clear skies, Steve
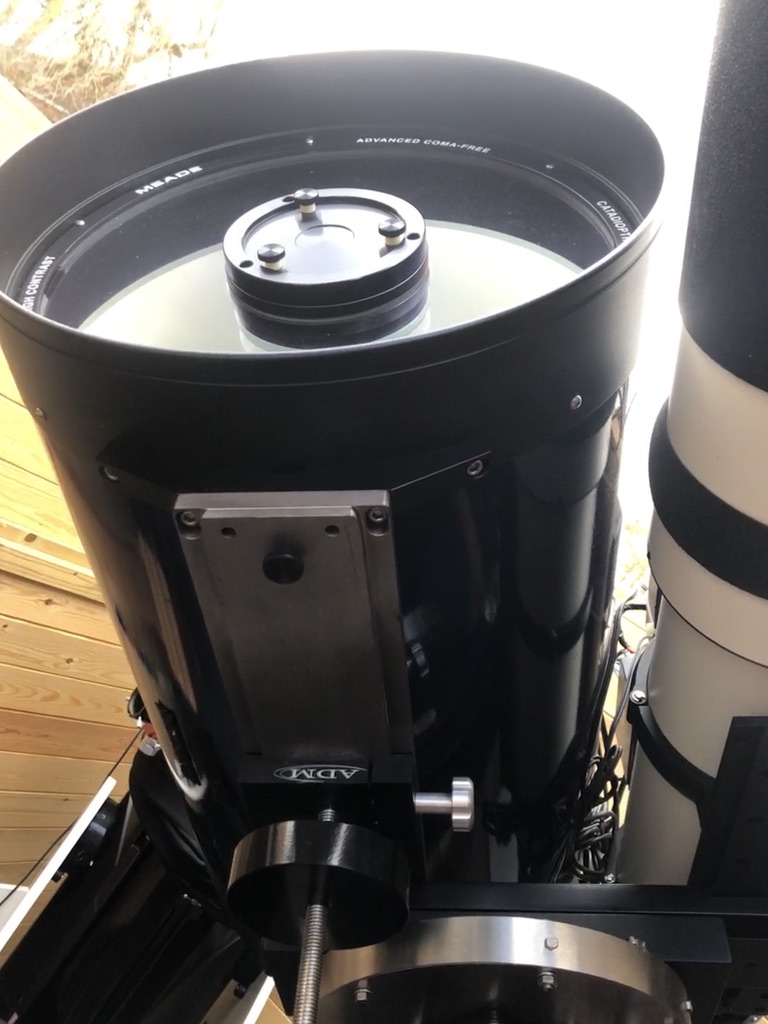
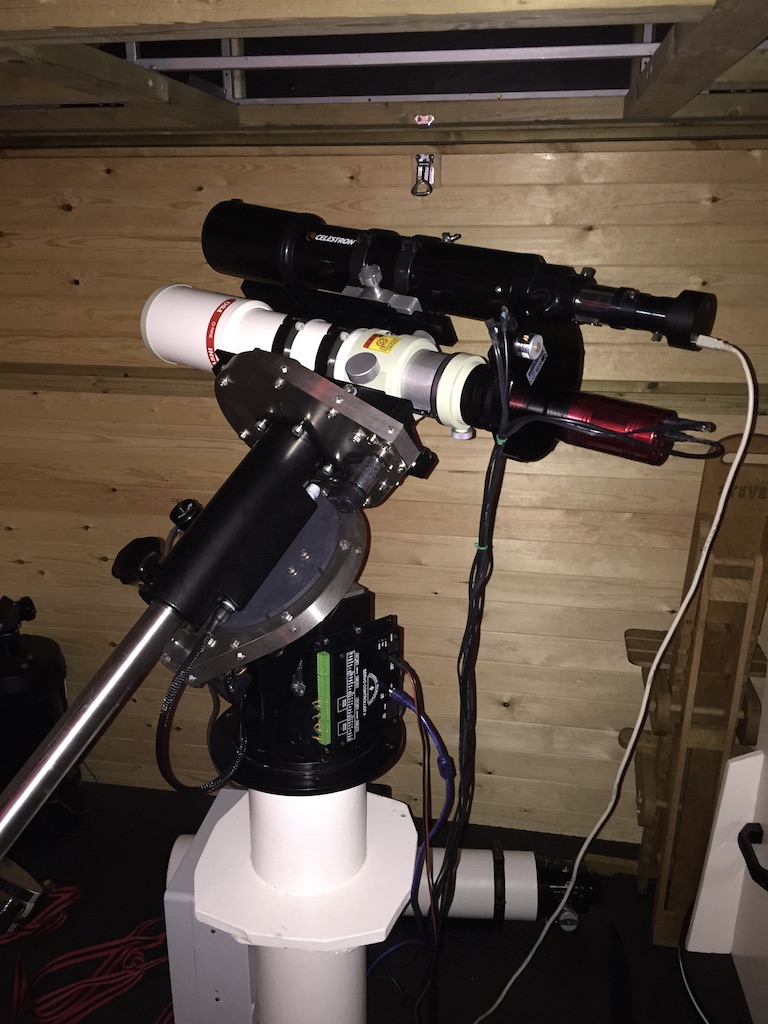
Meade 14" ACF
I bought the 14" ACF SCT Optical Tube Assembly (OTA) telescope in excellent condition in April 2019 second hand. These ACF (Advanced Coma Free) SCT scopes from Meade have an excellent flat field and my intention upon purchasing this scope was to use it for lunar and planetary visual work and also for some astrophotography.

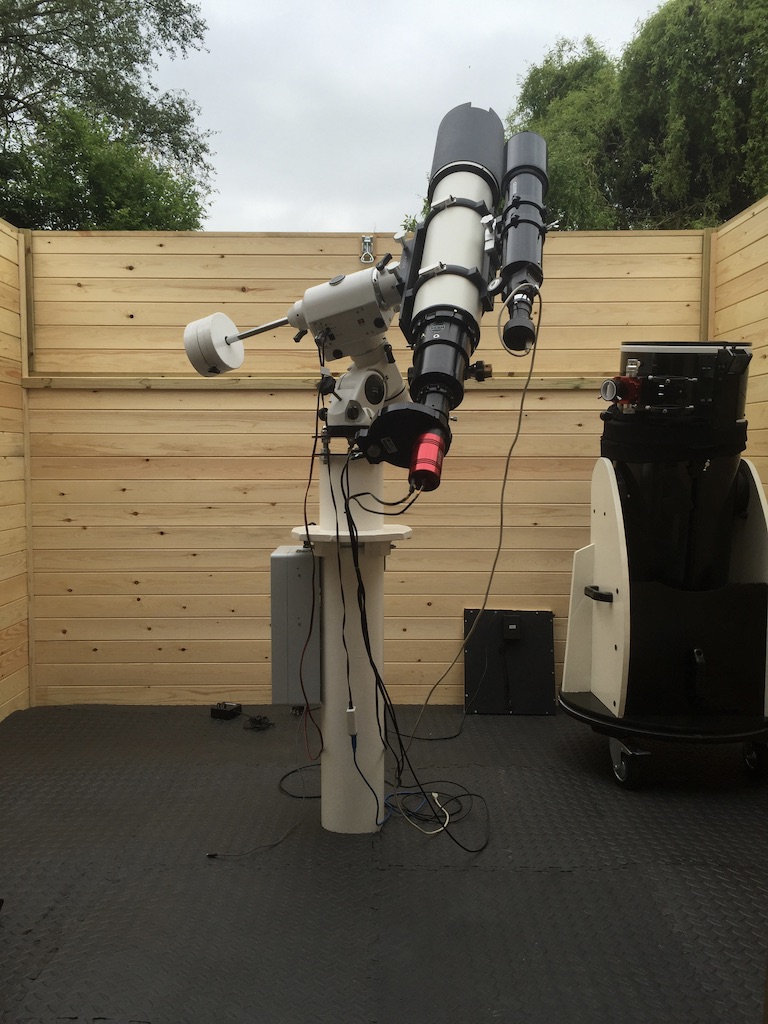
The SCT telescopes increase in size and weight is almost exponential with their increasing aperture. This scope is VERY heavy at almost 27kg and I had it mounted side-by-side with my [also heavy] TEC140. I needed almost 40kg of weights to balance this combination. It was very close to the MESU200's maximum weight carrying ability and caused the mount to shiver for a few moments after any physical touch of the mounted telescopes.
I originally intended a three scope combination with the Meade 14", TEC140 and my FSQ85, the latter two attached to the cameras since I only use these for astrophotography. However, no matter what I tried I could never get this combination to balance in all orientations. If I got it balanced in the parked position then they'd be unbalanced in the "point east
position". Get it right pointing east and the meridian flip would fail. It was like a game of whack-a-mole and a balance problem would repeatedly keep popping up no matter how I adjusted the scopes on their dovetails and in their saddle. In the end I abandoned mounting the FSQ85 and did a dual rig side-by-side with the Meade and the TEC140. Even this was never perfectly balanced and caused the MESUs friction drive to give way on some occasions and I'd awake in the morning following an all-night imaging run with the scopes pointing up at the zenith. Also, because the scopes were so heavy it was a challenge for the MESU to hold them perfectly steady.
I fitted the Meade with a Moonlite Crayford focuser and equipped it with motor focus. With such a long focal length and physical touching of the scope to focus it causes the observed object to wobble for a few seconds and makes focusing a challenge without motorfocus. The fitting of the motorfocus massively assists the usability of the scope. Indeed, I'd suggest just using the mirror focuser would be a very big ask when trying to fine focus.
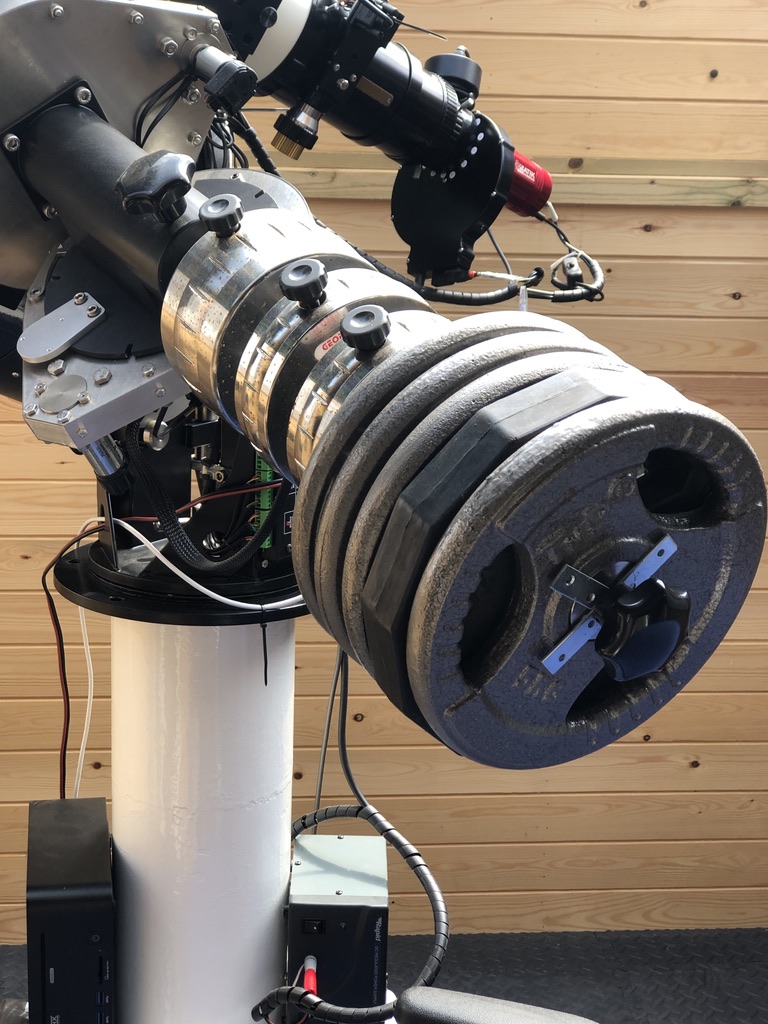
Meade Side by Side with TEC140
Bottom of Meade 14"ACF
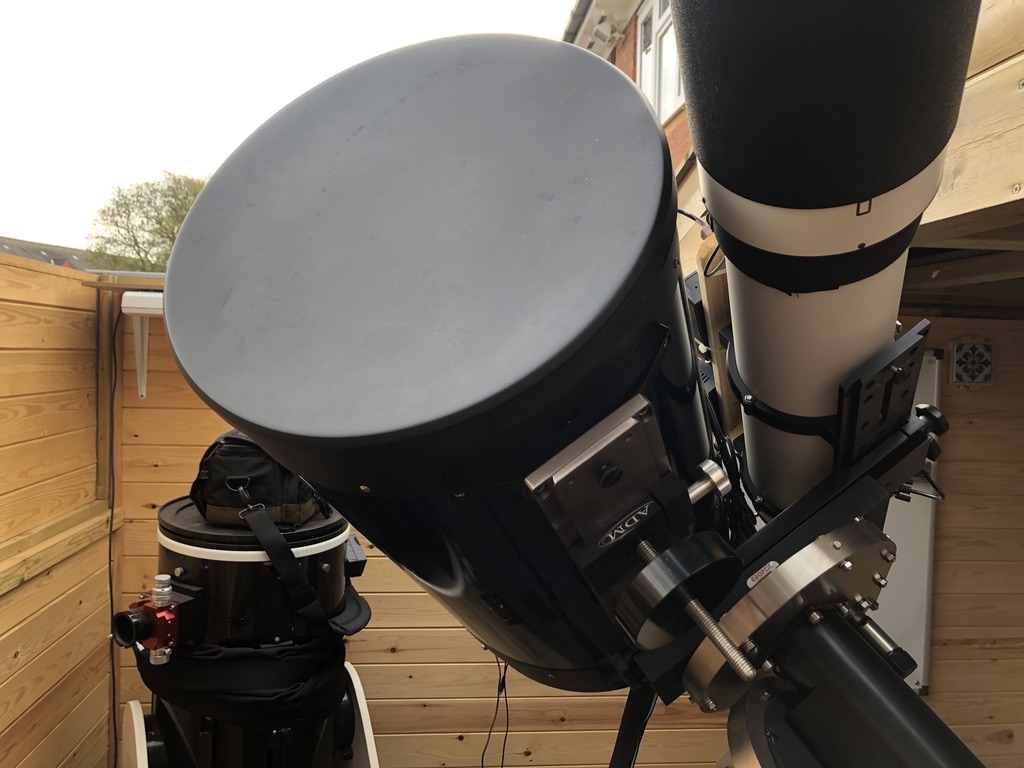
Side of Meade 14" ACF
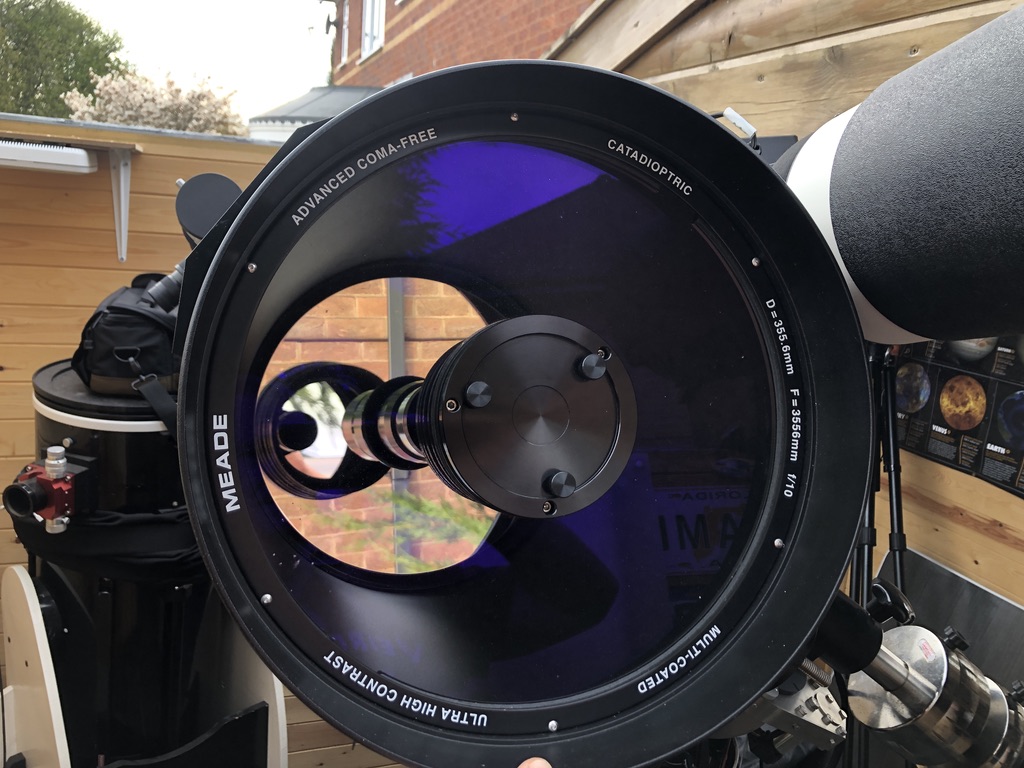
Meade 14" ACF Corrector
Meade 14"ACF with Moonlite Crayford motor focus
Side View
I sued the scope a lot on The Moon and for some deep sky observations. It excelled on objects such as M27 and M13 and other small objects needing a significant focal length.
However, my overall ownership was a bit of a disappointment and this is absolutely in no way a fault of this magnificent telescope. It is a result of my own aperture fever. Such a telescope in a Bortle 5 suburban sky is always going to be significantly handicapped and this indeed proved the case here. So much so in fact that I hardly even used it on faint galaxies because such objects are drowned out by the light pollution. Jupiter and Saturn were very poorly placed for observers at my latitude (53N) during my ownership so I never got chance to use it on those. In fact, I found my Celestron C925 showed as good a view in my skies. For these reasons, I sold the telescope, minus the focuser in May 2020, after a year of ownership. In the end I sold it to someone from Derbyshire Peak District who has dark skies. I was sad to see it go because in the right skies it will be magnificent.
Meade 14" ACF
I bought the 14" ACF SCT Optical Tube Assembly (OTA) telescope in excellent condition in April 2019 second hand. These ACF (Advanced Coma Free) SCT scopes from Meade have an excellent flat field and my intention upon purchasing this scope was to use it for lunar and planetary visual work and also for some astrophotography.
The SCT telescopes increase in size and weight is almost exponential with their increasing aperture. This scope is VERY heavy at almost 27kg and I had it mounted side-by-side with my [also heavy] TEC140. I needed almost 40kg of weights to balance this combination. It was very close to the MESU200's maximum weight carrying ability and caused the mount to shiver for a few moments after any physical touch of the mounted telescopes.
I originally intended a three scope combination with the Meade 14", TEC140 and my FSQ85, the latter two attached to the cameras since I only use these for astrophotography. However, no matter what I tried I could never get this combination to balance in all orientations. If I got it balanced in the parked position then they'd be unbalanced in the "point east
position". Get it right pointing east and the meridian flip would fail. It was like a game of whack-a-mole and a balance problem would repeatedly keep popping up no matter how I adjusted the scopes on their dovetails and in their saddle. In the end I abandoned mounting the FSQ85 and did a dual rig side-by-side with the Meade and the TEC140. Even this was never perfectly balanced and caused the MESUs friction drive to give way on some occasions and I'd awake in the morning following an all-night imaging run with the scopes pointing up at the zenith. Also, because the scopes were so heavy it was a challenge for the MESU to hold them perfectly steady.
I fitted the Meade with a Moonlite Crayford focuser and equipped it with motor focus. With such a long focal length and physical touching of the scope to focus it causes the observed object to wobble for a few seconds and makes focusing a challenge without motorfocus. The fitting of the motorfocus massively assists the usability of the scope. Indeed, I'd suggest just using the mirror focuser would be a very big ask when trying to fine focus.
Meade Side by Side with TEC140
Bottom of Meade 14"ACF
Side of Meade 14" ACF
Meade 14" ACF Corrector
Meade 14"ACF with Moonlite Crayford motor focus
Side View
I sued the scope a lot on The Moon and for some deep sky observations. It excelled on objects such as M27 and M13 and other small objects needing a significant focal length.
However, my overall ownership was a bit of a disappointment and this is absolutely in no way a fault of this magnificent telescope. It is a result of my own aperture fever. Such a telescope in a Bortle 5 suburban sky is always going to be significantly handicapped and this indeed proved the case here. So much so in fact that I hardly even used it on faint galaxies because such objects are drowned out by the light pollution. Jupiter and Saturn were very poorly placed for observers at my latitude (53N) during my ownership so I never got chance to use it on those. In fact, I found my Celestron C925 showed as good a view in my skies. For these reasons, I sold the telescope, minus the focuser in May 2020, after a year of ownership. In the end I sold it to someone from Derbyshire Peak District who has dark skies. I was sad to see it go because in the right skies it will be magnificent.
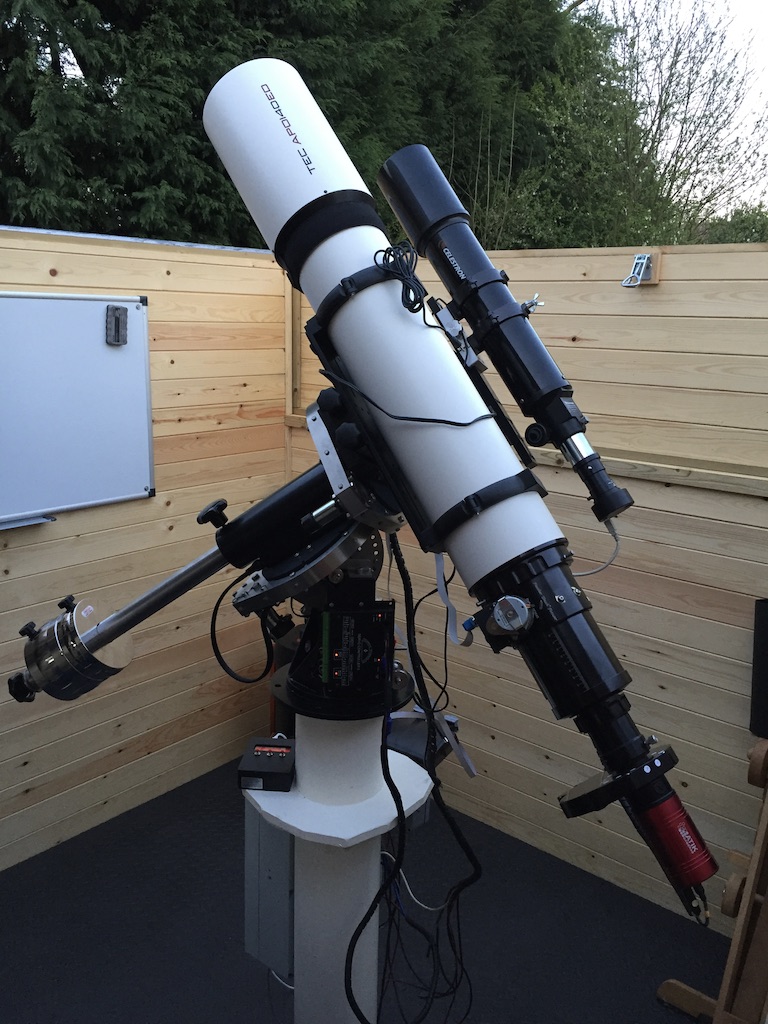
My TEC 140 Refractor - Ordering, Review and Impressions

Please note, the opinions expressed here regarding my TEC 140 are mine. No one paid me any money, offered me any free equipment or offered me any discounts or services on anything astronomy or otherwise nor did they request I write this article. I bought my telescope with my own money and I offer my thoughts, ideas and opinions to help others because I enjoy doing so, not for material or financial gain for myself. If the scope sucks, rest assured I will say so.
Introduction
Mention the word "telescope" to the general public and they will almost certainly think of what we astronomers know as a refractor. If you asked a child to draw a telescope, it's a refractor they will draw for you. Refractors are the oldest of telescopes and it was a refractor that Galileo pointed at the stars and Jupiter in 1610.
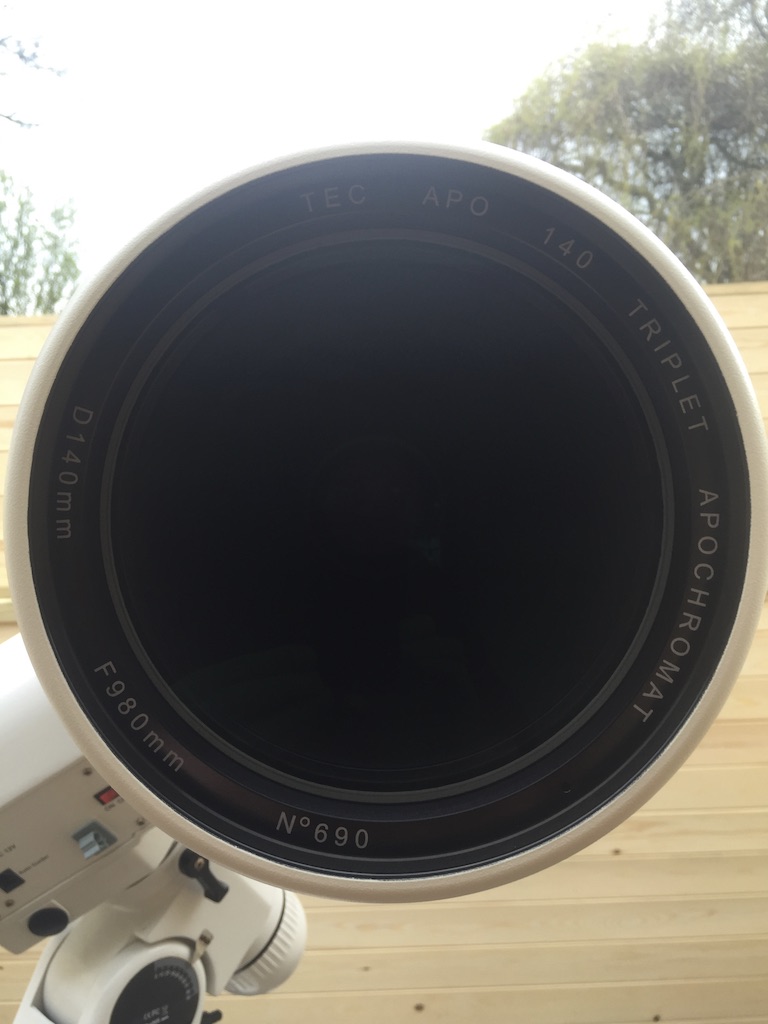
I have long been a refractor enthusiast. For sure, SCT's and Newtonian telescopes in their various guises are great too and offer a lot of aperture for the money and I use those types as well. But the simplicity of a refractor takes some beating. They require no regular collimation, no hours of cooling, they are easy to keep clean and simple to use. I have a wide-field, high quality Takahashi FSQ85 refactor for astrophotography and I wanted a high quality, premium refractor of about 5 - 6 inches (130-150mm) aperture for closer scale imaging and lunar observation - something I enjoy a lot. I considered several options; maybe an AstroPhysics Star Fire? Great, but a ten year waiting list and an astronomical (pardon the pun) cost to go with it. I considered a Skywatcher Esprit 150 too but they were very early in their production cycle and I had no wish to be a guinea pig (as in turned out, these are great scopes too). But in the end, after reading many reviews and speaking to some other owners, I settled for the TEC 140 from Telescope Engineering Company based out of Golden, Colorado, USA. This is a highly colour corrected, 140mm clear objective diameter, 980mm focal length F7.0 scope.
The TEC 140 is a premium quality - and priced - instrument. It sits within several lines of refractor that TEC makes and the TEC140 is the second "lowest" of the line since they make a TEC 110 as well (110mm objective). The TEC refractor line ranges from from the aforementioned 110mm all the way to the mighty (and giant) 250mm (10 inch) refractor. Additionally, the models larger than the TEC 140 (starting with the TEC 160) start to use more exotic (and expensive) types of glass for even better colour correction than the already superb TEC140.
We can dream, for sure, about these huge, expensive refractors but leaving the stratospheric larger models to one side, I decided to go for the TEC140.
Ordering
I contacted Yuri Petrunin, an optical engineer originally from The Ukraine who is the founder and owner of TEC, to discuss how I go about ordering and owning a TEC 140. This is so popular a telescope and has such a great reputation that, despite costing $7400 (2016 prices, check for the latest price), he can sell the small production batches he makes each year many times over. Rumour has it that he only makes about fifty or so TEC 140 scopes per year. He invests in high quality production methods and he has not been tempted to outsource his operations to cut costs and he makes the telescopes himself with his son and a couple of other highly skilled craftsmen. TEC grind and polish the lenses and make all the metal work themselves. So, despite dealers advertising these telescopes, they will have to go to Yuri and join his manufacturing queue, just as if you were to order directly from him yourself, as I did.
To join Yuri's production queue he required a deposit of $1200. Being in the UK I had to find a way of converting my currency (pounds sterling ££) to US dollars, so I paid the deposit with an international banking service XE.com. I am not being paid by them to say that, just letting you know how I did it, and there are no doubt many others offering this service too. However, XE.com did me a good exchange rate, a modest fee (about $25) and the transfer goes across to Yuri inside a day or two. If the production queue is full for the next production run you will have to wait for Yuri's next batch which could be a full year later. Depending on how busy he is (and I will forewarn you that he is VERY busy) this could add another 6 - 12 months to the time you get your scope. So if you want one of these TEC scopes you need to get yourself onto Yuri's queue as soon as you can.
Once you are in the production queue Yuri will keep you in the loop about what is happening. He does not deliver a running commentary but lets you know what you need to know. About seven months after I paid my deposit Yuri let me know my scope was built and ready to ship and to pay the remaining balance. Upon paying the balance (again, I used XE.com) and shipping fees (the shipping and insurance were about $250 to the UK), the scope was shipped to my home in the UK with a shipping number and I eagerly watched its progress from Yuri in Colorado, via Denver and San Francisco then cross the Atlantic Ocean to Heathrow, UK via the UPS tracking number. I had to pay significant UK import duties plus 20% sales tax (VAT) and other government fees to the tune of about £1300 (about $1800) before the UK customs released the package. Upon completing the UK import tax forms (UPS and other shipping agents help you do this), UPS released it from UK customs and delivered it to my home address.
All in, my TEC140, landed at my door with all duties and shipping paid, was a £7500 investment (about $10000). A lot of money. Shortly afterwards, following the Brexit referendum in the UK, the £sterling rate tanked against the US dollar and would have made my scope over £1500 more expensive !!! So I consider myself very lucky to get the scope when I did. Despite that, £7500 or $10000 is a serious investment into an hobby by any standards. But I justified it to myself because this is a lifetime scope and I had some commission from work. I also spent some of the money from my late wife left me since I know she would have wanted me to have this scope. Thank you Yvonne ♥️ xx
Receipt Of The Scope
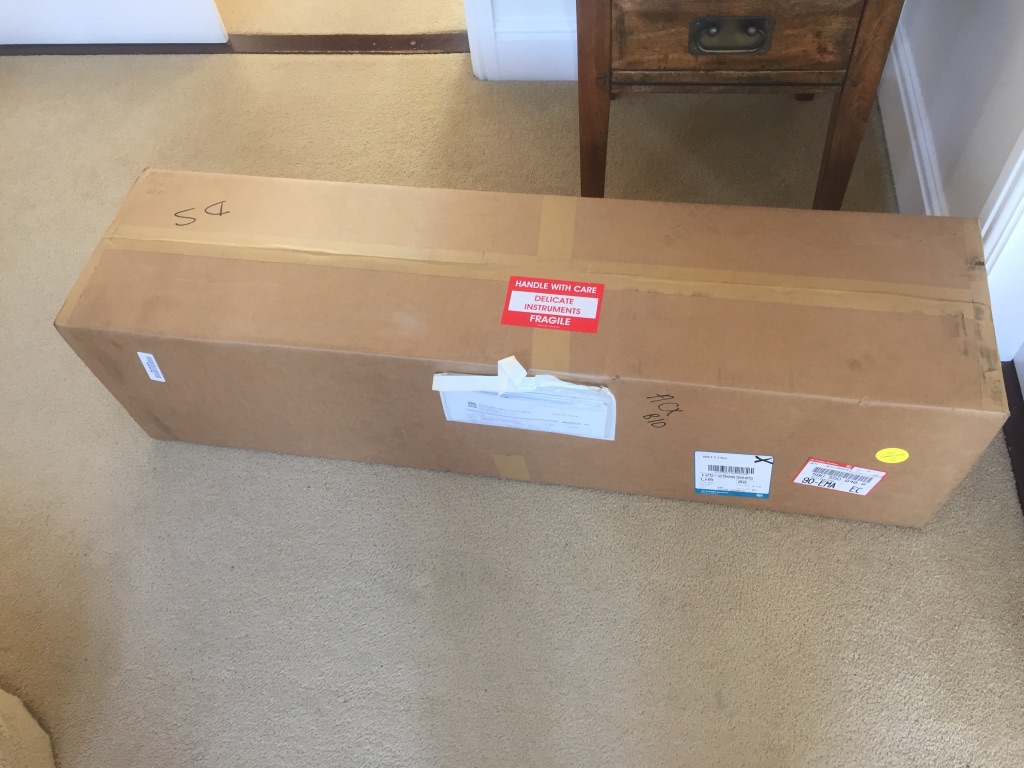
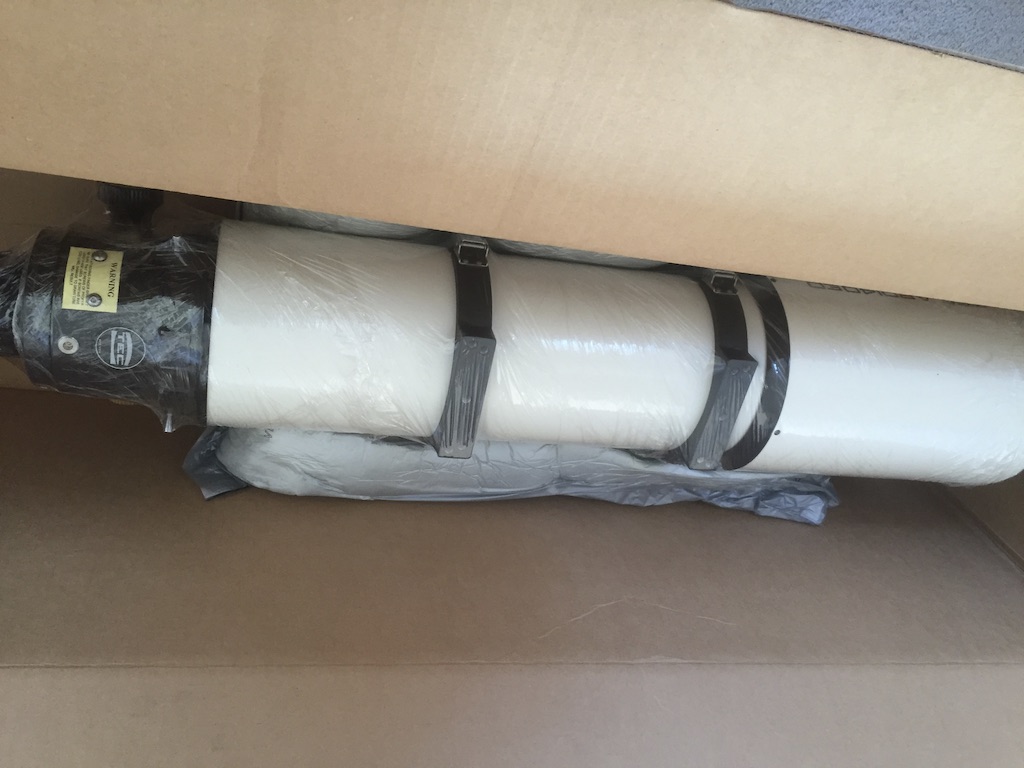

The scope is shipped in a strong and rigid cardboard carton with very strong and rigid styrofoam moulded to the shape of the scope to protect it. The scope inside is then wrapped and sealed in Polythene-like material with some desiccant to absorb any moisture. You could also specify your scope be provided (and shipped) in a permanent, hard exterior and felt lined shell storage case that you can purchase at the time of order. However, since my scope will be permanently mounted in my observatory I elected not to specific this option. The only option I chose upon ordering was to specify the Losmandy dovetail plate. I had no need of Yuri's finder (an option you can also specify) since I use my own red dot laser finder. (Update: As of 2023 - seven years later - my TEC140 has been permanently mounted and has never been outside my observatory).
My initial reaction upon opening the box was one of "wow!" and being incredibly impressed. My scope, made by Yuri for me, was utterly immaculate in every way and is a thing of beauty with its matt white coat paint, the beautiful Starlight instruments 3545 focuser and the immaculate front lens element, proudly engraved with the scope's serial number - in my case number 690. There were no marks at all on the glass elements - it was crystal clear.
The build quality is impeccable. It is robustly made with very high quality materials and with a superb fit and finish. It has a weight and heft that is very reassuring. It is a scope made by an astronomer for astronomers. Yuri is so experienced and knows what astronomers want and need in a scope.
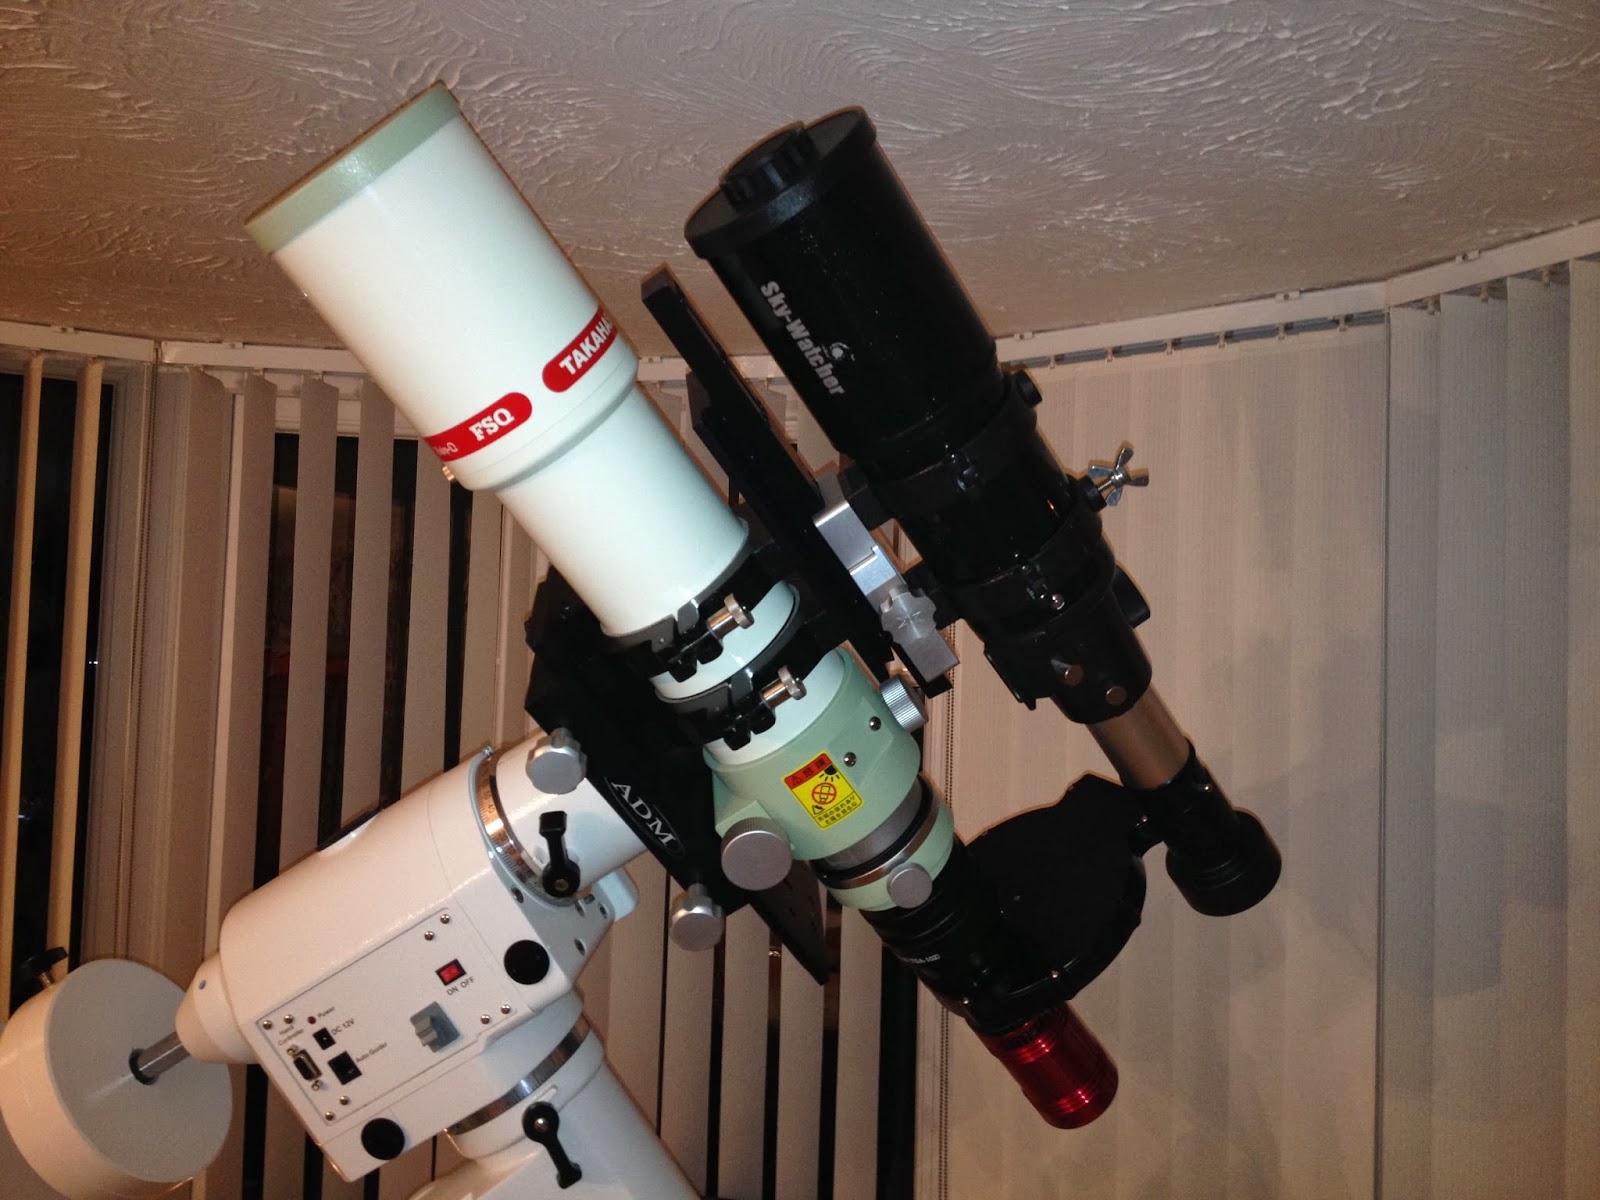
Almost immediately upon opening - literally within the hour - I had it mounted on my Skywatcher NEQ6 mount. I have since repurposed this mount and bought a MESU 200 but the NEQ6 held the TEC 140 with no problems at all. I think you guys in North America call this mount the Atlas mount. I installed my guide-scope onto the mount and a Dew Shield. This is not my current telescope/mount configuration but was the one I used at the time in April 2016 (I now have the TEC140, FSQ85 and Celestron C925 all simultaneously mounted).
Now, all astronomers will know of the "new gear curse" - namely, when you've got new kit to test out you can be almost 100% certain that it will coincide with weeks of cloudy weather. This uncanny curse effects me and almost everyone else almost all the time. Yet, uncannily, on the very day I received the scope in April 2016, it was quite clear! Miraculous!!!! So that night, the moon was up, and I love lunar observation with quality refractors. They bring it to life with a vibrancy that you just don't get with an SCT in my opinion. So what a golden chance to test my new scope!
Using my Williams Optics 2" diagonal and a Televue Nagler 17mmm I pointed it at The Moon and swallowed hard when I looked through the eye piece. I was disappointed..... disappointed that I had not bought one of these superb telescopes YEARS BEFORE!!!!! The crispness of the detail, the vibrancy of the image, the porthole view of the moon in exquisite detail with zero colour fringing!!! I then went onto split some double stars. The scope split them without breaking a sweat almost down to its theoretical limit.
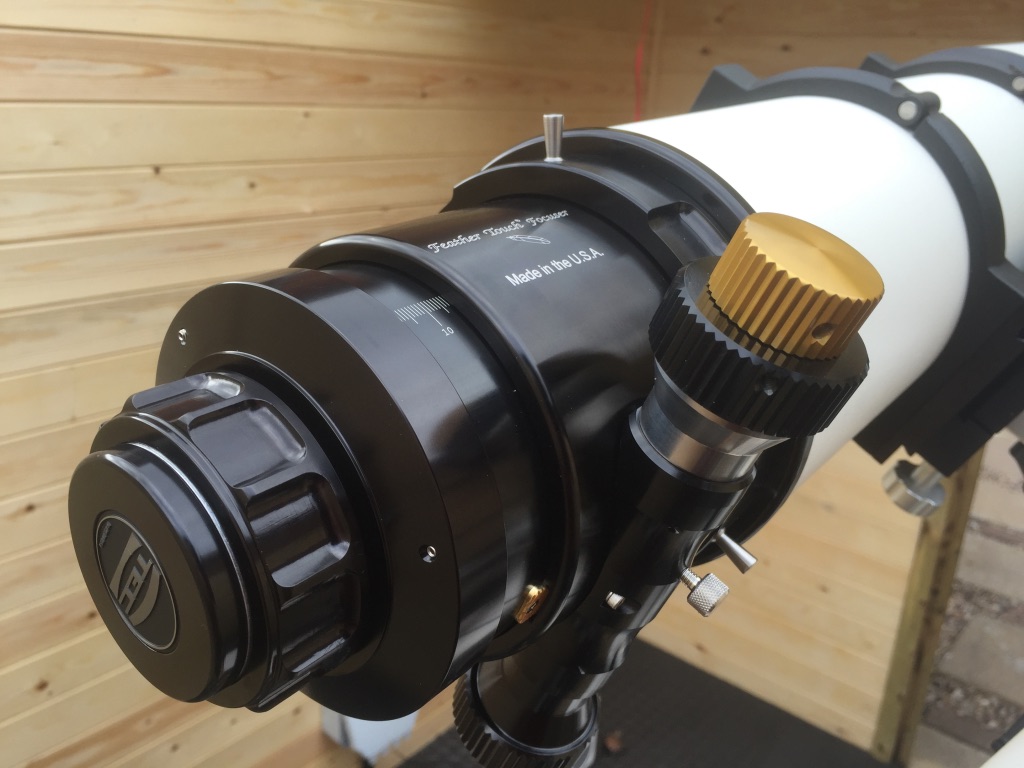
The 3545 focuser is weighted perfectly and it is wonderfully smooth. The 1:10 reduction feature makes the focusing simple and easy.
I then did some astrophotography with the scope, paired with my AtIk 460 CCD Camera. Superb and so easy to use. The captain's wheel allows the whole focuser assembly to be rotated to frame the object. With cheaper focusers rotating the focuser with the captain's wheel in this way throws out the focuser completely - even my [very] expensive Takahashi FSQ85 suffers from this. I found that with the TEC 140 I lost focus only minutely, allowing the autofocus to easily bring the precise focus back. It is magnificently engineered.
I have since equipped my TEC 140 with the optional field flattener and a Lakeside motor focus to allow unattended focusing and I will discuss these two additions separately. However, both of these additions are optional and the scope is superb to go as-is, right out of the box.
Please click on the tag cloud to the right and select TEC140 to see my images created with this magnificent scope. I'll add that I am not the best expert at astrophotography and the TEC140's capabilities are vastly in advance of my own.
Negatives? I really can't think of any, I really mean that and you can trust me to report it had there been any issues but there truly isn't. That's always a key indicator of a superb product that has been thoroughly thought through and researched. Sure, it is expensive, but that is the price you pay for this type of quality.
Conclusions
$10000 is a lot of money for sure. But sometimes in life, if you want the best in class you have to get the wallet/pocketbook out, breathe deeply, swallow hard and go for it. That's what I did here. To me this is a "lifetime scope". It is so good, so premium, so well made, it is something to cherish and I can never see myself selling it. It is a superb scope for visual observations and also excels at astrophotography. If you can afford to buy one and you don't mind waiting for a few months for it to be made, I would recommend Yuri and the TEC140 unhesitatingly.
Feel free to add any comments or questions below.
Clear skies!
Steve
P.S. I'll add more photos of the scope.

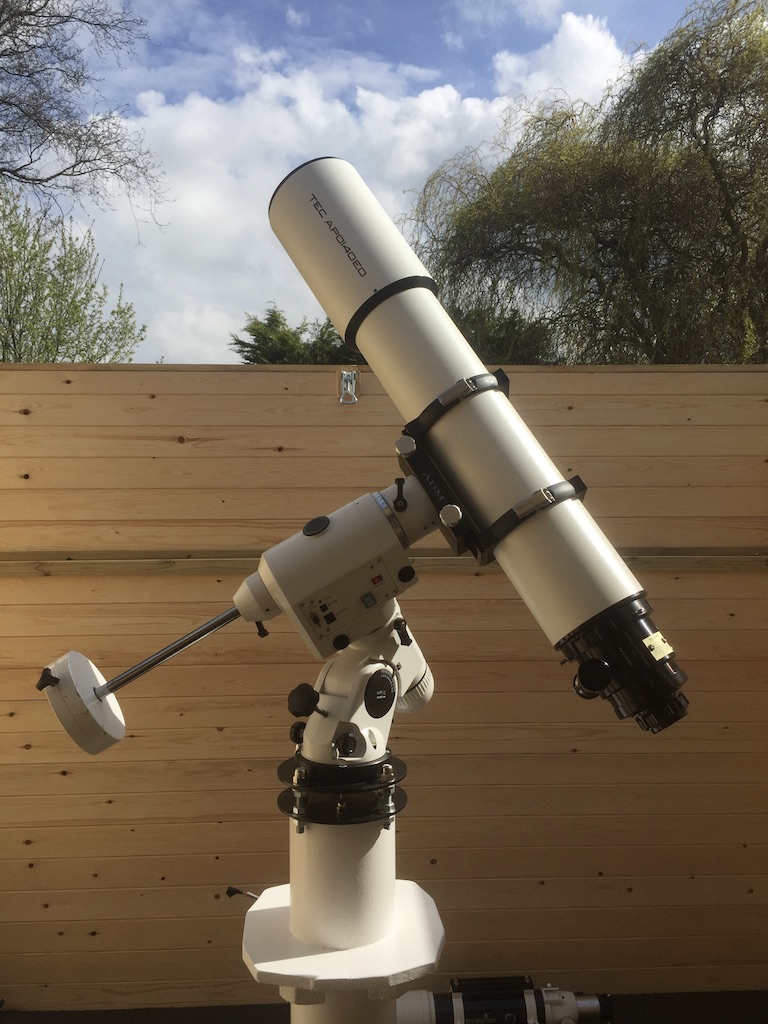
EDIT April 2023: still loving my TEC140. Here is a picture looking up from the focuser along the length of the telescope. TEC is mounted on MESU 200 mount and dual mounted with my FSQ85 and Celestron C925
I absolutely love the TEC140. It is a powerhouse of a telescope. It is brilliant for lunar, planetary and deep sky visual work and astrophotography. It has good aperture and superb optics.
Further Experience with Takahashi FSQ85 Baby Q
I have had the scope for three weeks now and have used it three times. That's good going in the UK in case you possibly thought that's bad; it's not uncommon to wait for six weeks for a first light in our cloudy climate! Anyway, leaving aside the usual British moans about our weather......
The FSQ is so easy to use. Just point it, focus and forget. I am using Baader LRGB filters in 1.25" guise in an Atik EFW2 filter wheel. These filters are stated to be parfocal. However, with my Skywatcher ED80 telescope I found they were not. The focus wandered slightly between the filters. I normally focus on the Luminance channel first. I then grab LRGB in that order. But by the time I got to the blue filter I found stars were becoming bloated, not massively - but enough to take the edge off the picture. This problem is definitely not an issue with the ED80 stock focuser - I could adjust that sufficiently to make it rock solid - but is more attributed to the differing light wavelengths coming to a minutely different focus with the ED80 primary objective, blue is always affected worse. This is hardly surprising at the ED80 price point and indeed, the ED80 is an excellent telescope for its price. When using the FSQ though the focus is perfect on all LRGB filters and is as perfect on all four corners of the image. It just makes the scope so easy to use. I sincerely hope this is also the case when I get some Baader narrowband filters as well. However. considering the FSQ is ten times the cost of the ED80 is it ten times better? Of course not. That is not the way of things - it is diminishing returns at this end of the market as is the case with any other premium product. You pay a massive amount more to make it 20% better.
The FSQ-85 focuser is heavy and robust. However, a slight word of caution here that knocks a mark off the score for the FSQ-85. I have found that with my filter wheel and camera attached (EFW2+Atik460 = just over 1kg so hardly that heavy) I find that I need to have some focus knob lock applied or else the focuser can start to very slowly slip when pointed at over 50 degrees or so above the horizon. This came as a bit of a surprise to me since I have read some web articles that state the focus lock can be fully undone and the focuser does not slip even when pointed vertically. This is not my finding; I need some focuser lock applied to "brake" the slip and can then use the fine focuser. That makes me give the scope 9/10. Otherwise it would have got a perfect 10/10. I penalise it a full mark since the focuser action is a critical part of using a scope and at this price point I should not be expected to start shelling out yet more money for after market focusers or fiddling with tightening screws etc. This is a Rolls-Royce scope; you don't buy a Roller and expect to be under the hood tinkering on day 1. I need to do some further research into this. Maybe the focuser can be "tightened" perhaps..... Or maybe my expectations are unrealistic and this is the whole point of having the focus lock. To be fair the use of the lock screw is pretty intuitive and easy. Had it not been I would have sent the scope back (EDIT 2016 - I now use a Lakeside autofocus system that prevents any wander of the focus)
What is very commendable about the FSQ is the accuracy of the Camera Angle adjuster and focuser working together. So, when I achieve precise focus and then need to turn the CAA to frame the subject (something that I will be doing all the time) the focus does not shift even a fraction. I checked it out by slewing the scope to a bright star and putting on the Bahtinov mask after so adjusting the CAA after previous focus - the focus had not moved at all. That shows how accurately the scope and its bits are made.
I have used the FSQ on two objects so far, in both cases at native focal length - I have yet to use it with the reducer even though I bought the reducer with the scope. I grabbed further data on M33 Triangulum galaxy to add to the image on my previous post and I also grabbed RGB on the Double Cluster.
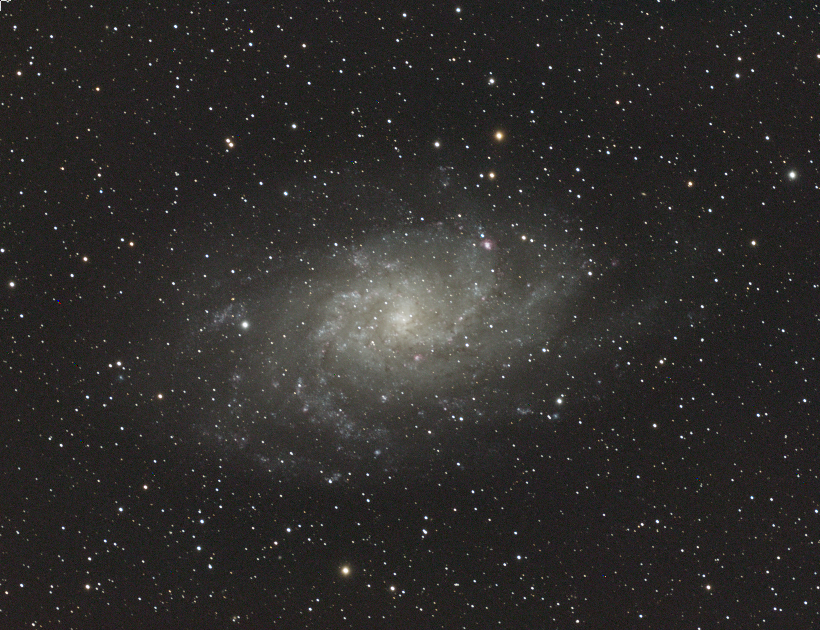
This image of M33 in Triangulum (lower quality here as a jpeg) has two hours of Luminance and 90 minutes each of RGB. The Luminance was 1x1 binned and the RGB was 2x2. The data was captured on the evenings of 21 and 25 November 2013 from my back yard (semi light polluted). I also should really have been using my IDAS Hutech Light pollution filter! All processing was in Pixinsight. The image needs more data to really let the spiral arms and the HII regions jump out. It could use some Ha as well. Nevertheless, it is coming along nicely I think. The two data sets are closely aligned and that will allow me to grab a whole lot more data. Next time it is clear I will grab a lot more luminance and Red data. Indeed, I might push the subs out to 15 minutes. What stops me doing that normally is that Nottingham is under the flight path for US West Coast flights from Heathrow that tend to plague my exposures! It hurts throwing away otherwise perfect 15 minute subs! However, I have recently discovered that Pixinsight's Windsorised Sigma clipping routines are extremely effective at removing plane and satellite trails, especially if I use dithering during capture.
The important thing to note is the stars are nice and round in the corners so the scope is performing very well! You can see this image at higher resolution here.
Next up is the Double Cluster in Perseus. This data was captured on 4th December 2013, again from my back yard. This time though I used the IDAS LP filter and this has reduced light pollution light splatter very effectively.

Star field pictures show errors in an optical system all too readily and I am very pleased the FSQ came through this test very well, despite very mediocre seeing on the night. Here are 30 minutes per RGB channel at 5 minutes exposures, binned 1x1. Higher resolution of this image is here. There is no luminance here at all. Also, no flats here since I mistakenly captured the flats at 2x2 binning as I normally bin 2x2 on RGB! Doh... Oh well, it still came out quite well with Pixinsight's DBE tool to remove the vignetting.
So, to sum up, I am very pleased with the scope so far. It is optically wonderful. It looks the part and I have great pride in owning it. The build quality is superb. The focuser is good and robust but has slight slippage that has taken the edge off a tiny, weeny bit.
Would I buy again? Absolutely! This is scope for life and look forward to doing some great things with it. I might even buy a FSQ-106 to go with it as well ;)
Next blog entries will be how I connect all the bits together to connect to my Atik EFW2 at both native and reduced. Another blog entry will be about how I mounted the scope to my NEQ6 and guide-scope.
My Takahashi FSQ85 "Baby Q"
I bought my Takahashi FSQ-85EDX telescope from Ian King Imaging in November 2013 and bought it with the 0.73 reducer and numerous Takahashi adapters. I have not as yet used it reduced, only at the native F5.3. I am very impressed with the scope so far. It weighs only 4kg but feels so much more than that. The scope is a thing of beauty with impeccable paintwork and build quality. This is truly a scope to last a lifetime if cared for.
I went around the mental "shall I buy a 85 or 106" loop a million times. However, I already have a TEC 140 telescope to give me a smaller (or zoomed in) image scale for smaller objects like M81, M87 etc and the Abell galaxy clusters. I felt the FSQ-85 gave me better options for wide-field imaging of large targets like M31, M33, North American Nebula, Rosette Nebula etc.

My FSQ-85 rig consists of a Skywatcher ST80 guide-scope with a QHY5 guide-camera. The whole shebang is mounted by ADM dovetails/bars/saddle onto a Skywatcher NEQ6 mount and I control it all via ASCOM/EQmod from my Dell D630 latitude laptop.
Here is a picture I did of M33 with 75 minutes of Luminance, binned at 1x1 and 20 mins each of RGB binned at 2x2. All this done on an Atik 460 at -21C. The seeing was terrible, the moon was rising and I was dodging clouds! To say the UK climate is challenging for Astro-Photography with our milky white skies and constant cloud is the understatement of the century!
The image really needs more data in the colour channels and ideally some Ha as well to bring out some of the HII regions. But not too shabby at all for a first light I reckon under the circumstances. All four corners are nicely round.
All in all I am impressed. I intend to do some videos of how I mounted this scope so watch out for those. I also will do some articles on how the camera connects to the scope in both reduced and native guises with the different Takahashi adapters.